Last updated: March 18, 2024 19:00 EST
Welcome to our stamp design tutorial where we'll teach you how to make a stamp online
using our stamp maker - StampJam.
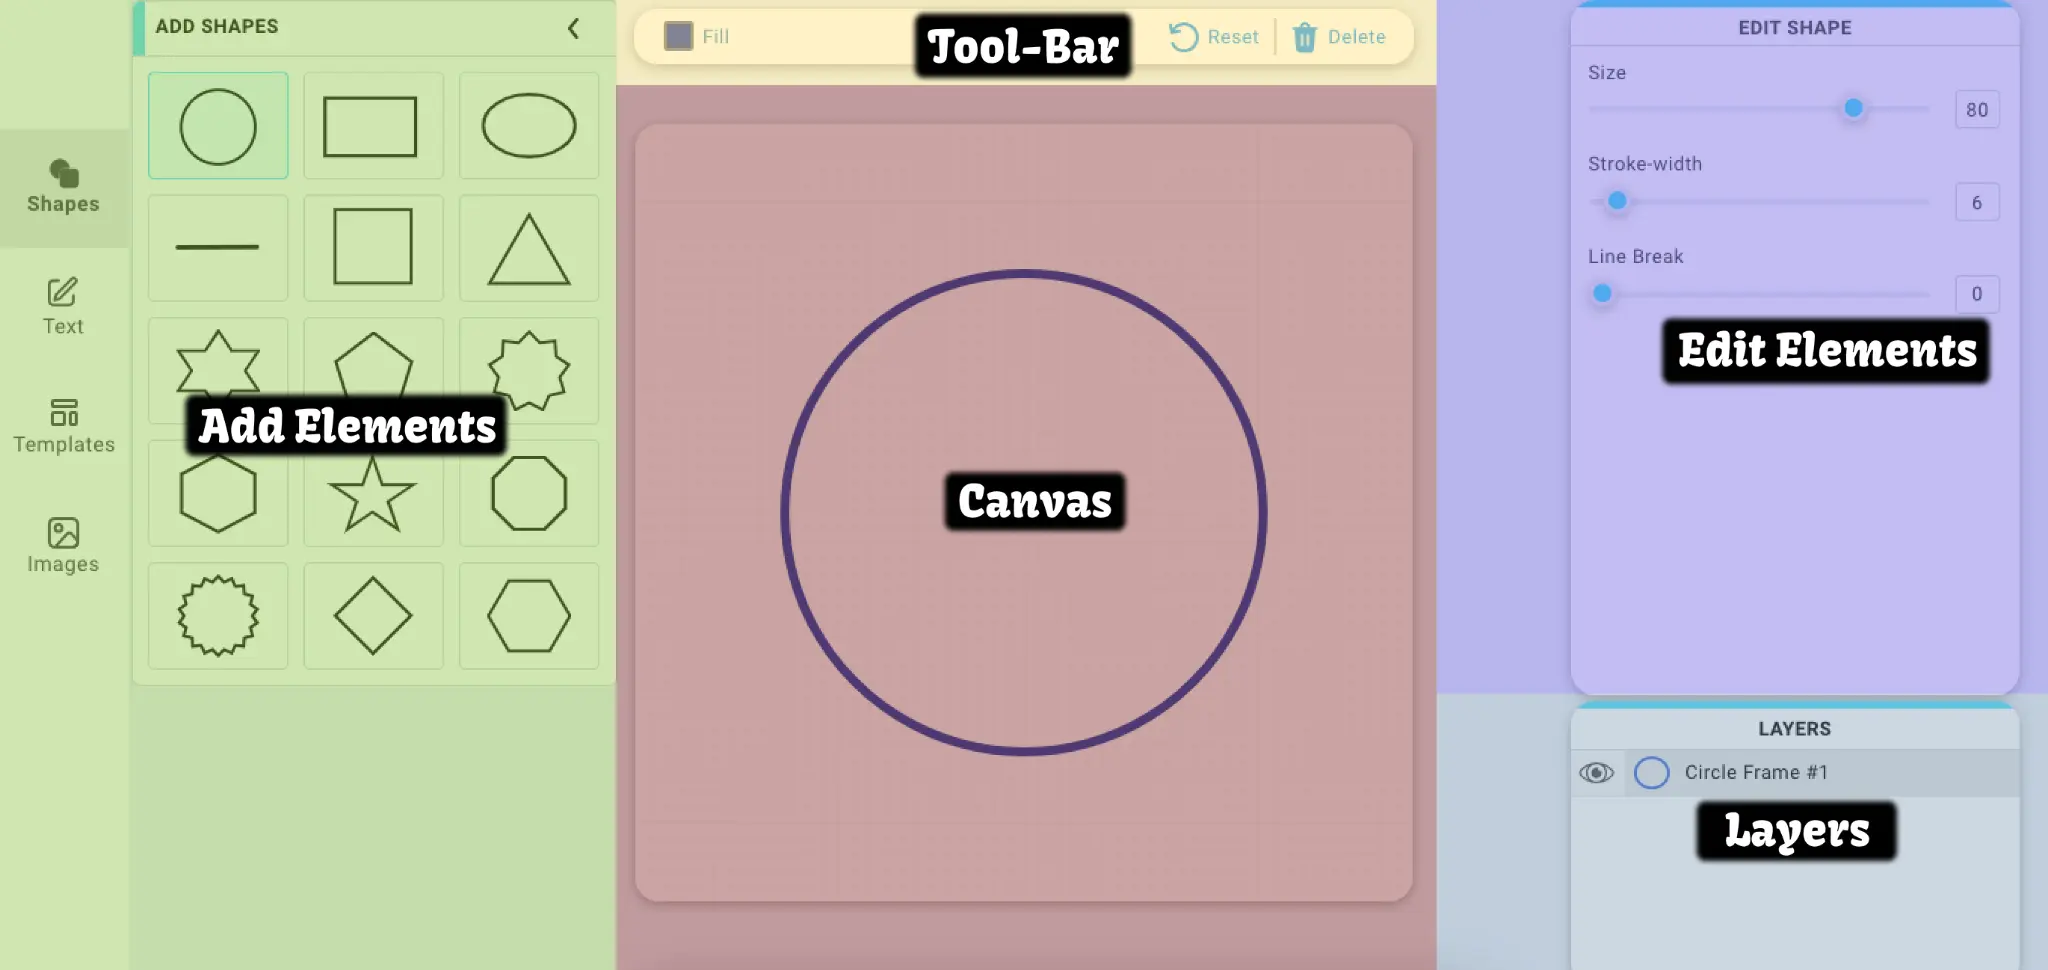
Our Stamp Designer is thoughtfully organized into Five (5) distinct
sections:
1. Add Elements: Adding shapes, text, templates & images
2. Canvas: Here is where you will be able to see your stamp design taking shape.
3. Edit Elements: Manipulating the elements added to the canvas to your design stamp.
4. Layers: Lets you choose the element on the canvas to edit, hide or delete. This is a very
handy feature while you create stamp online.
5. Tool-Bar: Lets you choose the color of your stamp and other functions we will talk more
about in the upcoming sections of our custom stamp online tutorial.
 Map: Add, Edit, Layers, Tool-bar & Canvas all work together to create custom stamp
online for your business.
Map: Add, Edit, Layers, Tool-bar & Canvas all work together to create custom stamp
online for your business.
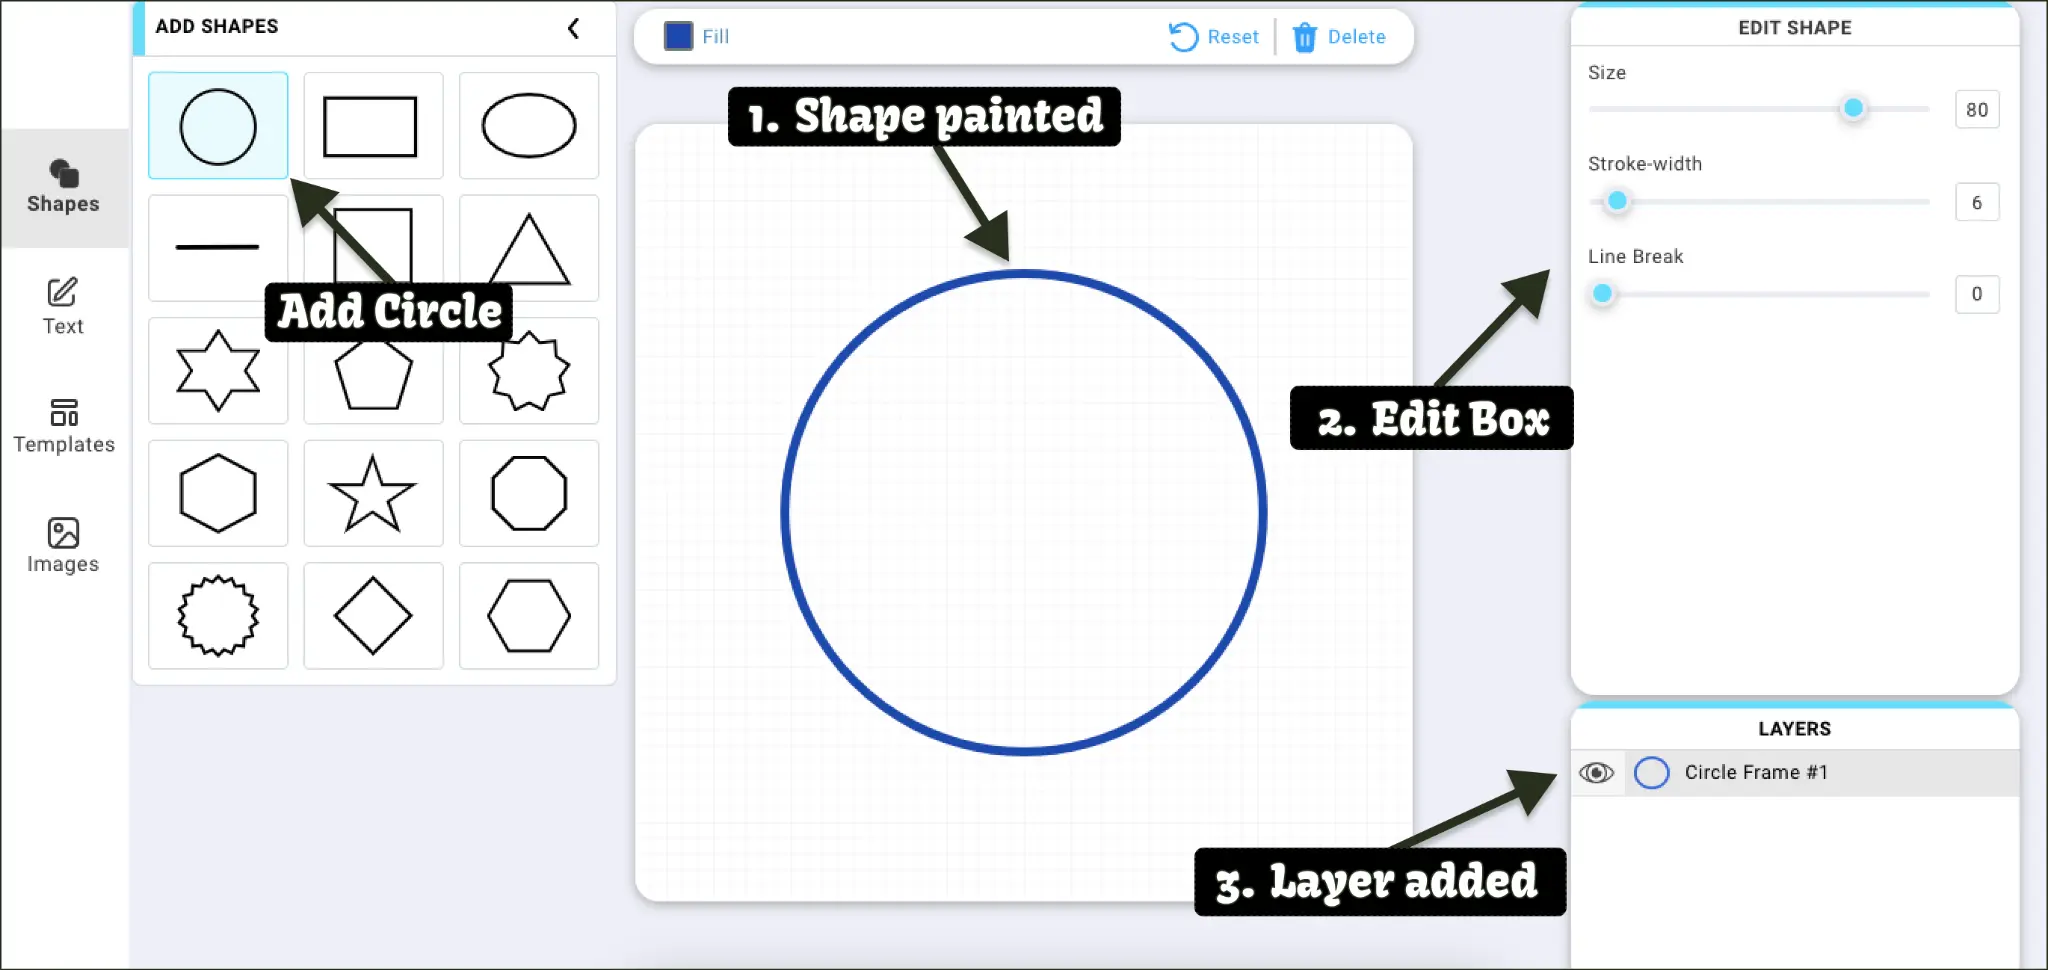
Adding elements is a breeze; simply select the desired shape, text, image
or template and it will be seamlessly “painted” in the center of the canvas.
Once you add any element to the canvas, 3 events occur simultaneously:
1. The added element is painted onto the canvas.
2. The edit box associated with the added element is generated on the right of the
screen.
3. The added element is entered into the “Layers” section.
 The Editing phase is where your creative side takes center stage.
It is during this phase that you will infuse your unique personal touch into crafting your very
own custom stamp.
The Editing phase is where your creative side takes center stage.
It is during this phase that you will infuse your unique personal touch into crafting your very
own custom stamp.
Now that we have a high level understanding of the major sections, let’s get into the finer
details and
follow a step by step process to design a stamp with StampJam.
Note: For the purpose of this stamp tutorial, we'll choose a Circle shape, envisioning the creation of a round company stamp.
Read along to learn how to make a stamp shape. The design journey commences with the selection of a shape. Rest assured, the chosen shape can always be changed or deleted later. To add a shape simply click on "Shapes" followed by the shape of your choice. The selected shape stamp will be added to the canvas.
Suggestion: Having a clear idea of your desired stamp shape can significantly streamline your workflow, saving you both time and effort. StampJam offers a diamond shaped stamp as well as different shapes of stamps such as a circle, oval, triangle or rectangle. You can even create heart shaped rubber stamps!
After adding a circle, let’s go ahead and edit it as per our requirement. We have provided 3 editing techniques for shapes:
Pro Tip: By using a combination of multiple circles, each with a different size, stroke-width & line-break you can achieve numerous variations of shapes. If you need to know how to change a stamps shape, keep reading!
The 3 editing techniques above apply to ALL 15 shapes irrespective of the shape of a stamp. The line shape has 3 additional editing techniques associated with it:
Note: Positional control is only applicable to the Line shape and Line text (we will talk more about the line text in the next section)
Since we have envisioned a round stamp, we will add a “Circular” stamp text in this step to complement the circle you added in the first step. This text will be added as a curve stamp text. To add text to stamp, simply click on "Text" followed by the circular text button. The chosen text will be painted on the canvas.
Pro Tip: Hover over the different text types after clicking “Text” on the left of the
screen. While you hover, you will notice a “Tool-tip” describing each text type. We have
provided 6 “Text” types:
1. Circular
2. Line
3. Square
4. Triangle
5. Rectangle
6. Quad
Important: It is very important to add at least one text element to your custom stamp design through which you can enter business, company, address and registration information.
If you don’t, the tool will not allow you to download your design and will give you a “Enter Text” notification. If it is unclear, learn how to add text to a stamp online by scrolling above. See image below.
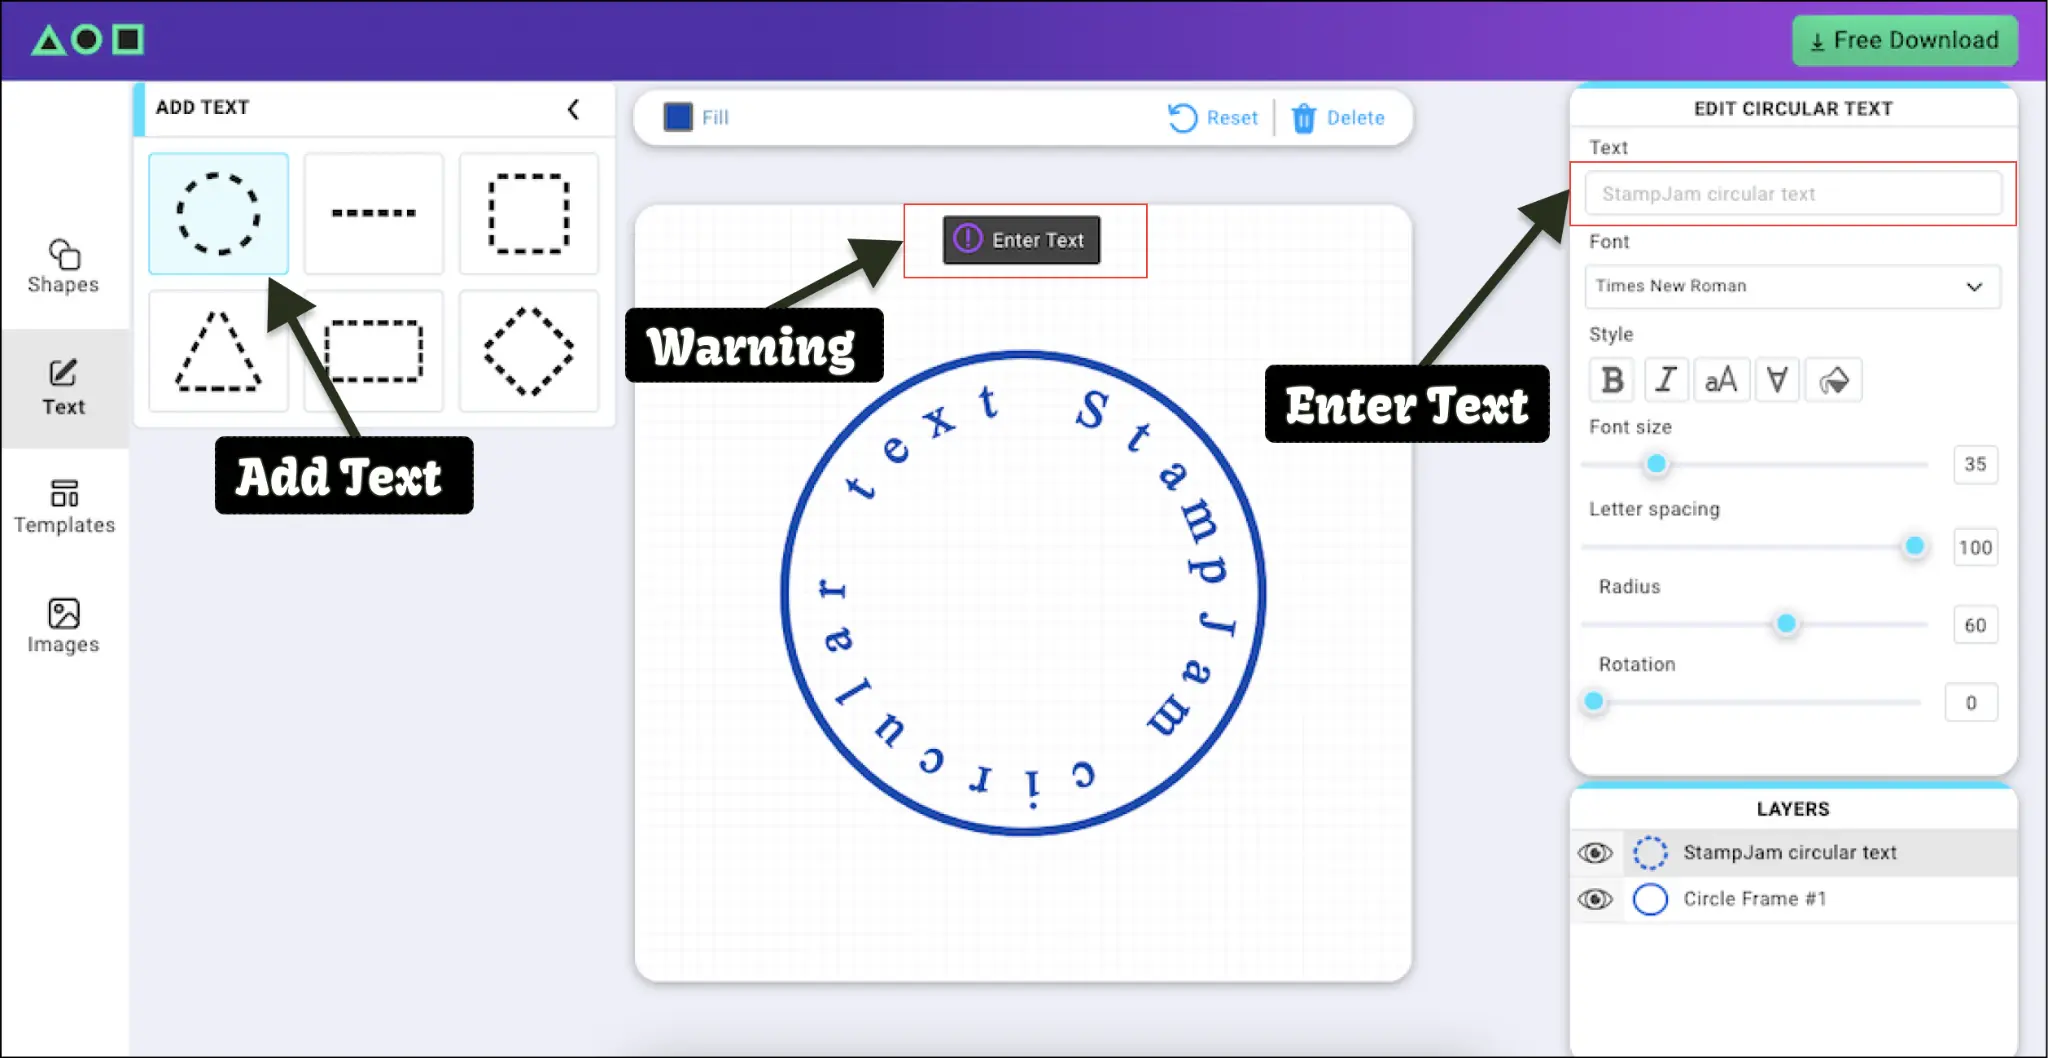
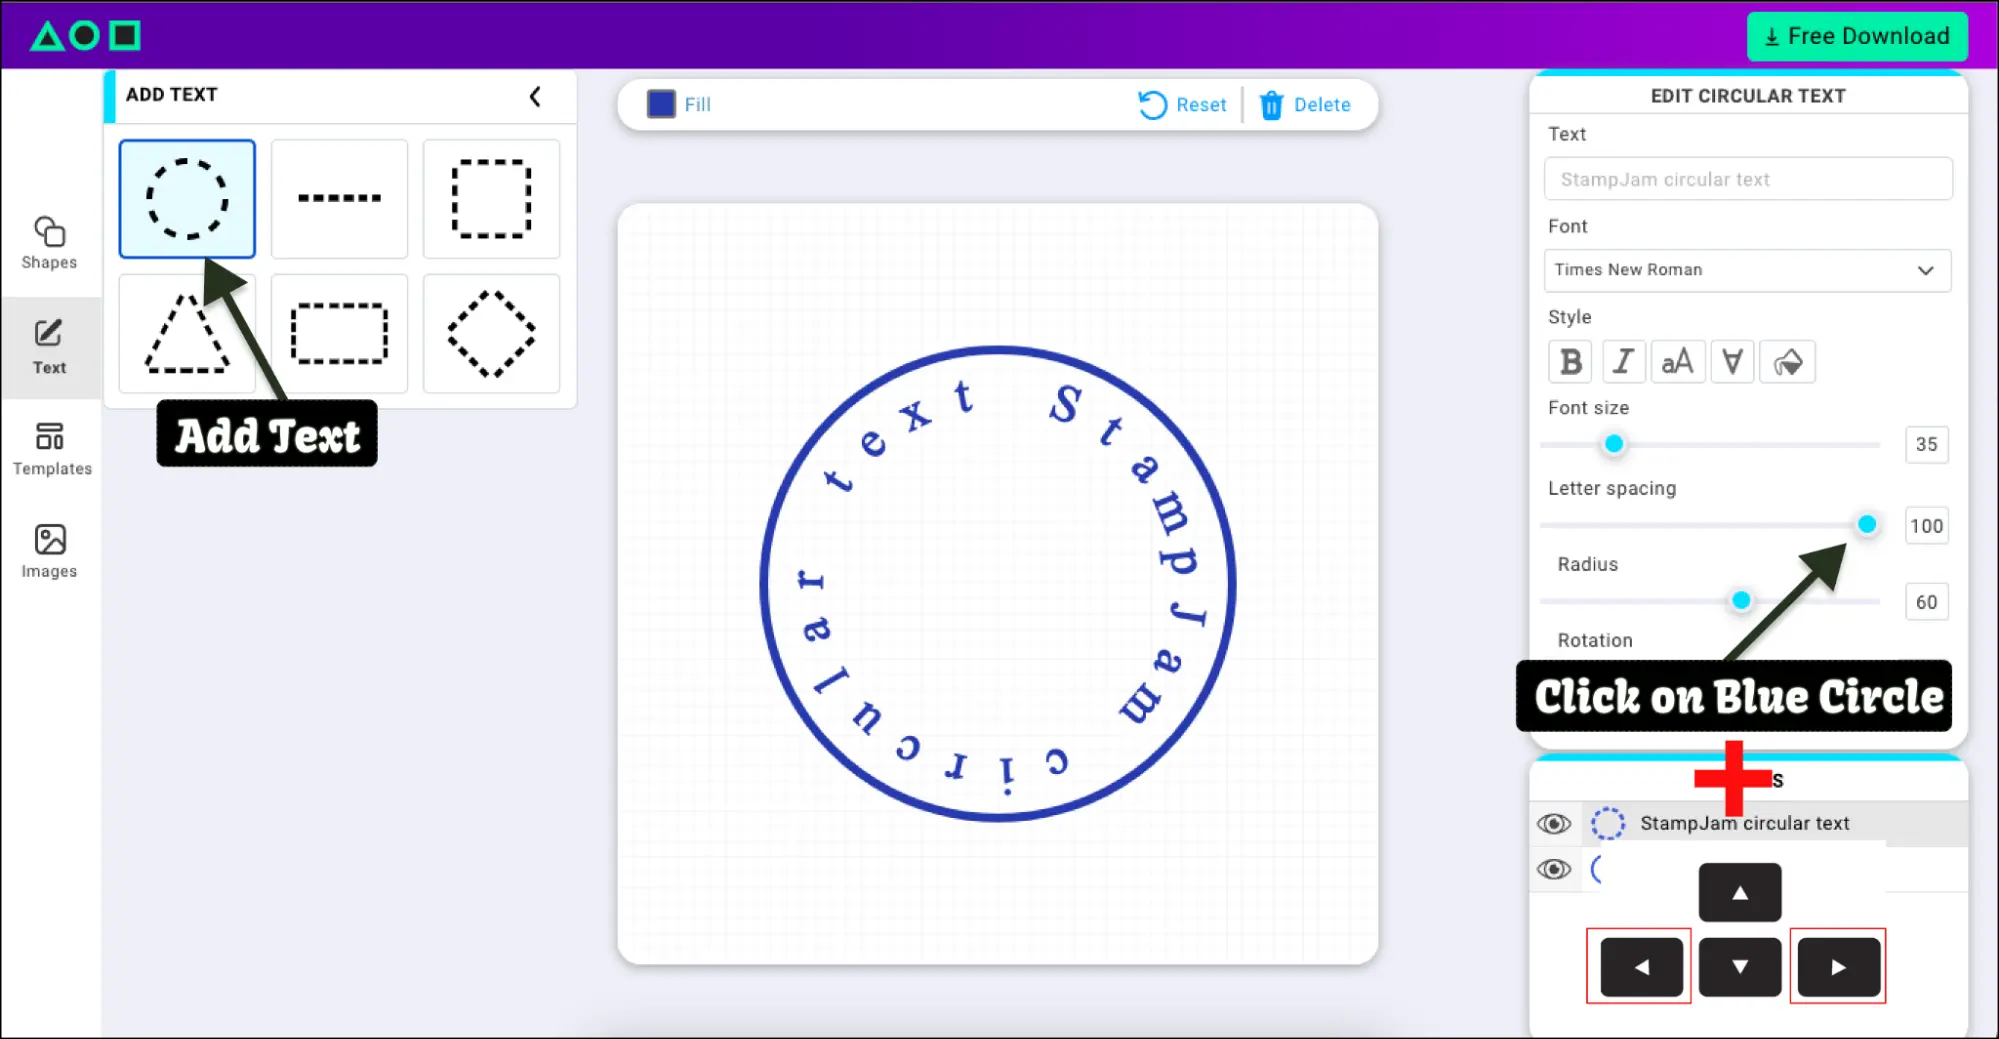
After adding a circular text, you will see its corresponding edit box generated on the right side of the screen. Now it’s time to edit stamp text by using the edit box that has a plethora of editing techniques. We will walk through each one so you get comfortable designing a custom stamp with StampJam.
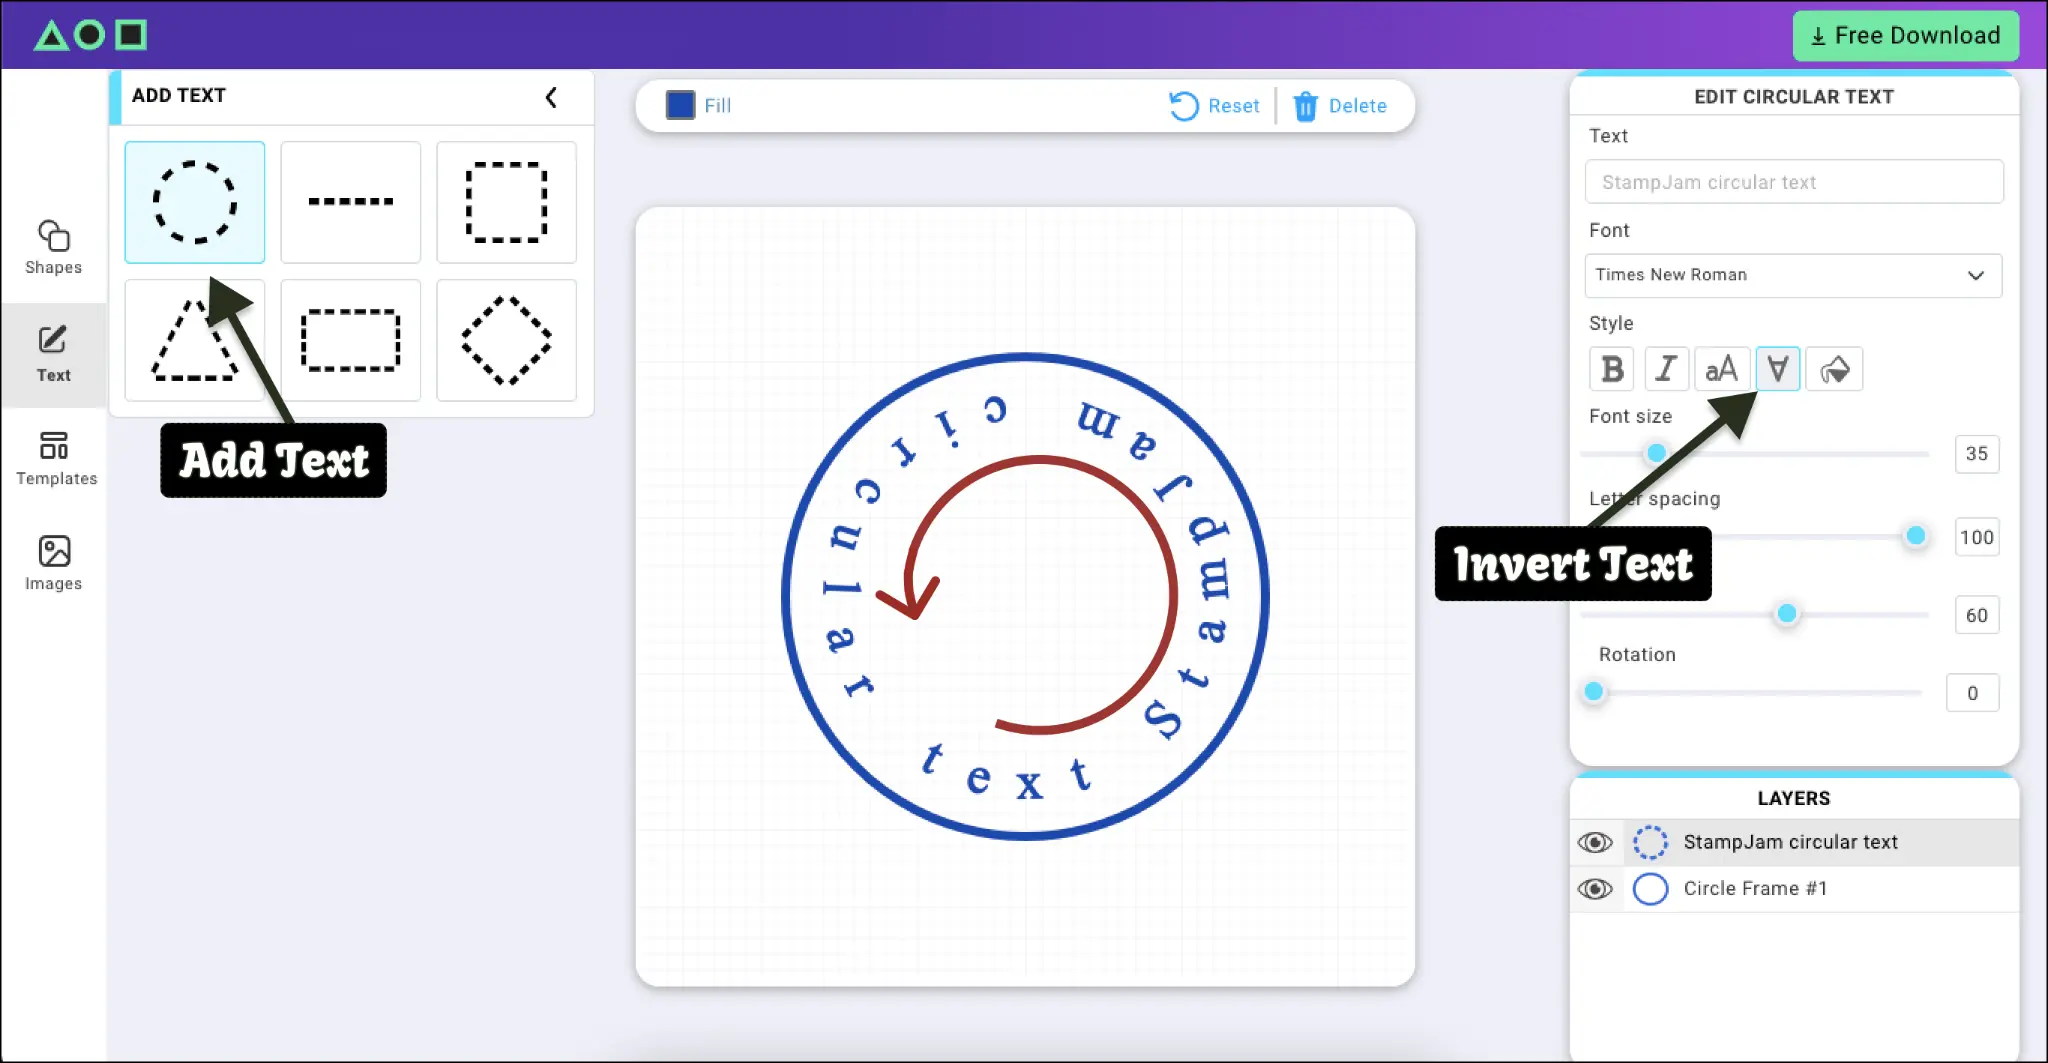
The 7 editing techniques above apply to ALL 6 Text types. The line text has 3 additional editing techniques associated with it:
Now that we have added shape(s) and text element(s), you can choose to add image to stamp from our image library, or upload your own brand logo. Keep reading to learn how to add a logo to a stamp online.
To add a stamp image, click on "Images" and then choose an image from our extensive image library. Once chosen, the image will be drawn in the center of the canvas and a corresponding edit box will be generated on the right side of the screen. Furthermore, its entry into the layers section will also occur. Once you add image to stamp online, we have 4 editing techniques for images:
To upload an image, click on "Images" --> “Upload Image” and choose an image from your
computer and click "Ok". The uploaded image will be painted in the center of the canvas.
Note: You can only upload PNG images into your stamp design.
And that’s how you can add rubber stamp font to an image! Next, we will dive into the tool-bar.
StampJam’s basic stamp editor has a “Toolbar” positioned directly on top of the canvas that allows you to:

1. Choosing a color:
Now that we have the building blocks in place, it wouldn't be a personalized stamp if you weren't allowed to change the color.
In order to change the color of the stamp using the stamping design tool, click on the “Fill Icon” from the “Tool-bar” section on top of the canvas. There are 4 ways to change the color:
2. Deleting an element:
Click any element from the layers section. After the element has been selected from the layers section, Click “Delete” from the tool-bar. Our cloned stamp online tool deletes the element permanently so be careful while choosing an element to delete. (Bringing an element back is not possible!)
3. Resetting the canvas:
If you are not satisfied with your design and want to start over, click on “Reset” from the tool-bar section --> click “Yes, clear the canvas”. This will permanently delete the design so that you can start the stamp design process again. After you click “Reset” from the Tool-bar, you will be given a notification before the design is deleted. If you are sure, click “Yes”, if this was made in error, click “No”.
Now that we have added a shape, text & image, edited them according to our requirements, it’s time to understand how to cloned stamp stamp between layers, edit on the go, hide and/or delete an element from your custom stamp using the stamp design layers section.
Let's dive into how to use layering stamps. The Layer section allows the user to choose an element from the layer’s list in order to:
Pro-Tip: The latest element added to the canvas will be on top of the layer list. Once you delete an element you can’t bring it back.
We have professionally designed 100’s of pre-made rubber stamp design templates for your convenience. You can always choose to start the design process with pdf stamp templates.
Step 1: Choose a shape
Even if you want to use a letter template stamp, electronic date stamp template or even a electronic submittal stamp template, our tool is designed to always start with a shape. It doesn't matter which shape you choose if you intend to use a template, the shape can always be deleted later.
Step 2: Choose a template and customize it
Click on Templates from the left side of the
screen. The desired template will be painted
to the canvas, saving you time and effort.
Now you can edit the template’s text, shapes and/or images.
Pro-tip: Filter the templates based on shape by clicking on any of the shapes from the top of the templates section. We have covered most templates and you can find the perfect match stamp wedding date template in our stamp collection.
Whether you need French language rubber stamps or German language rubber stamps, any and all foreign language stamps can be designed using our tool.
The Canvas will paint your chosen language on the canvas. Happy Stamping!
Once you are satisfied with your stamp design, it is time to download it.
Click on “Download” in the top right of the page > enter your email address, name & card details > click “Pay”.
Wait a few seconds while our system processes your request. If you payment was successful, you will see a Download button on the next page. Click "Download"
Check your email as we send another copy of your design to the email address provided in the previous step. The email will have a zip folder attached and the contents of the zip folder are mentioned below:
Aaaaand that’s a wrap! You are now fully equipped to design a custom stamp in 3 EASY steps!
We hope you had as much fun designing your own stamp as we did teaching you how to!
Businesses require all kinds of stamps. One such kind of stamp is a rubber signature stamp. In fact custom signature rubber stamps improve speed & efficiency as well as security in document processing. Our signature stamp maker is very simple to use in order to create your very own custom signature stamps. Follow the steps below:
Pro-Tip:By adding a Line text and inputting a date you will be able to create a professional signature and date stamp. If you need a more fun stamp such as a Santa Claus signature stamp, you can do that too!
There you have it! Your very own signature stamp that will save you time and money - Happy stamping!
Sometimes you may want to make tiny or incremental size or positional changes to an element in your stamp. For example, you may want to adjust the font size so it fits perfectly in your design. But dragging the font size slider may increase or decrease the font size more than intended. In this case, it will be more effective to use your computer's keyboard to make incremental changes. Here is how you can achieve it.
1. Click on the Thumb (blue circle) of the slider you wish to increase or decrease.
2. Now use your keypads left or right key to decrease or increase the value of the slider.
Pro-Tip: You can also use your escape key to close shapes, text, templates or image sections. Furthermore, the escape key can also be used to close any warnings/pop-ups during the stamp design process. You can also enter the value in the input field on the right of every slider to increase or decrease its value. This works in the same way dragging the slider changes the input.
1. Add a shape from our shapes library & increase it Stroke-Width.
2. Add a complimenting text to the canvas. (if you have added a circle, add a circular or line text)
3. Now click “Whiten” under the style section of the text. You will notice the text disappears. But worry not, it has not been deleted or hidden. It is merely “White” in color.
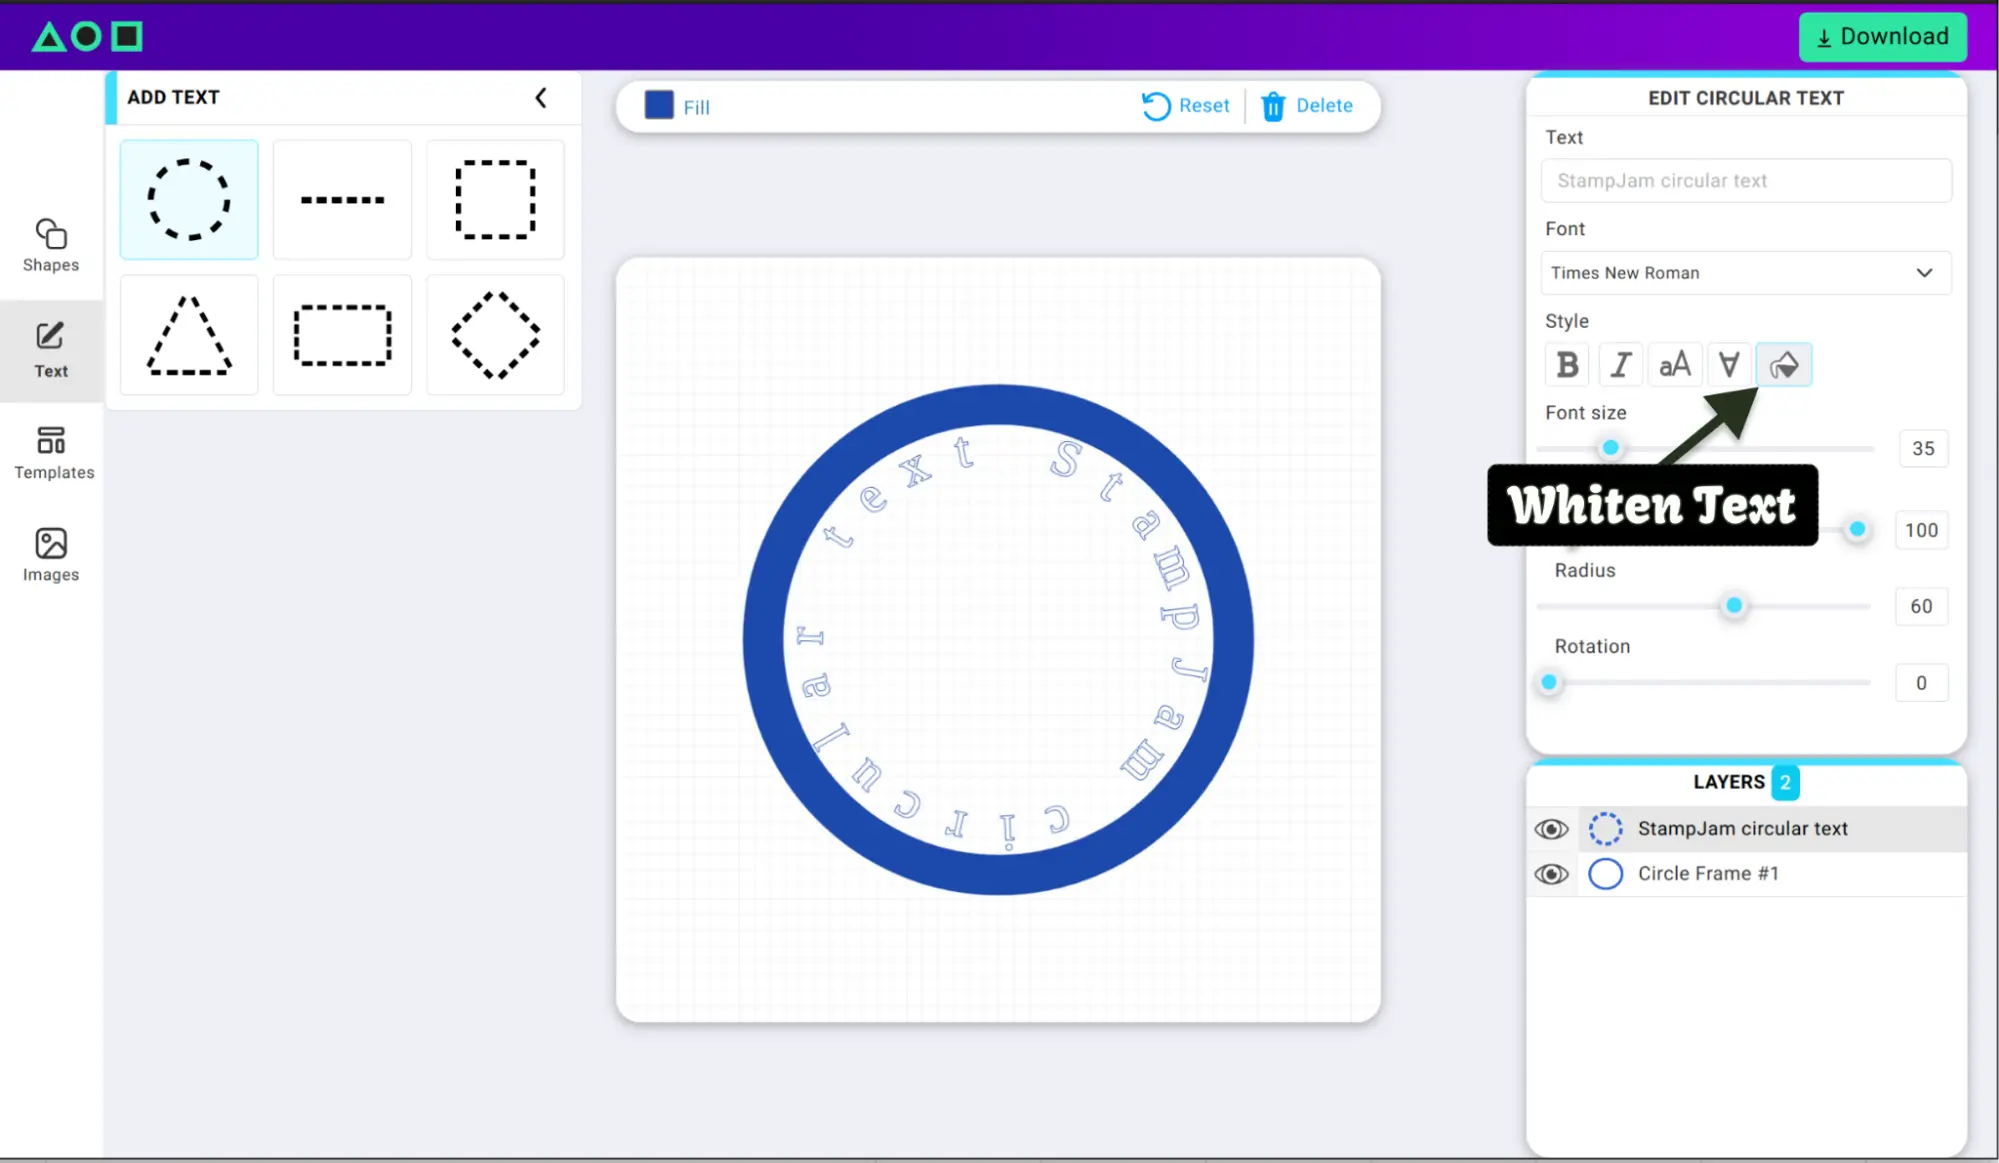
4. Now increase the radius of the circular text so it aligns within the thicker border of the shape you added from Step 1.
5. You will notice that the text magically appears within the border of the shape. Refer image below to fully understand how this editing technique works.

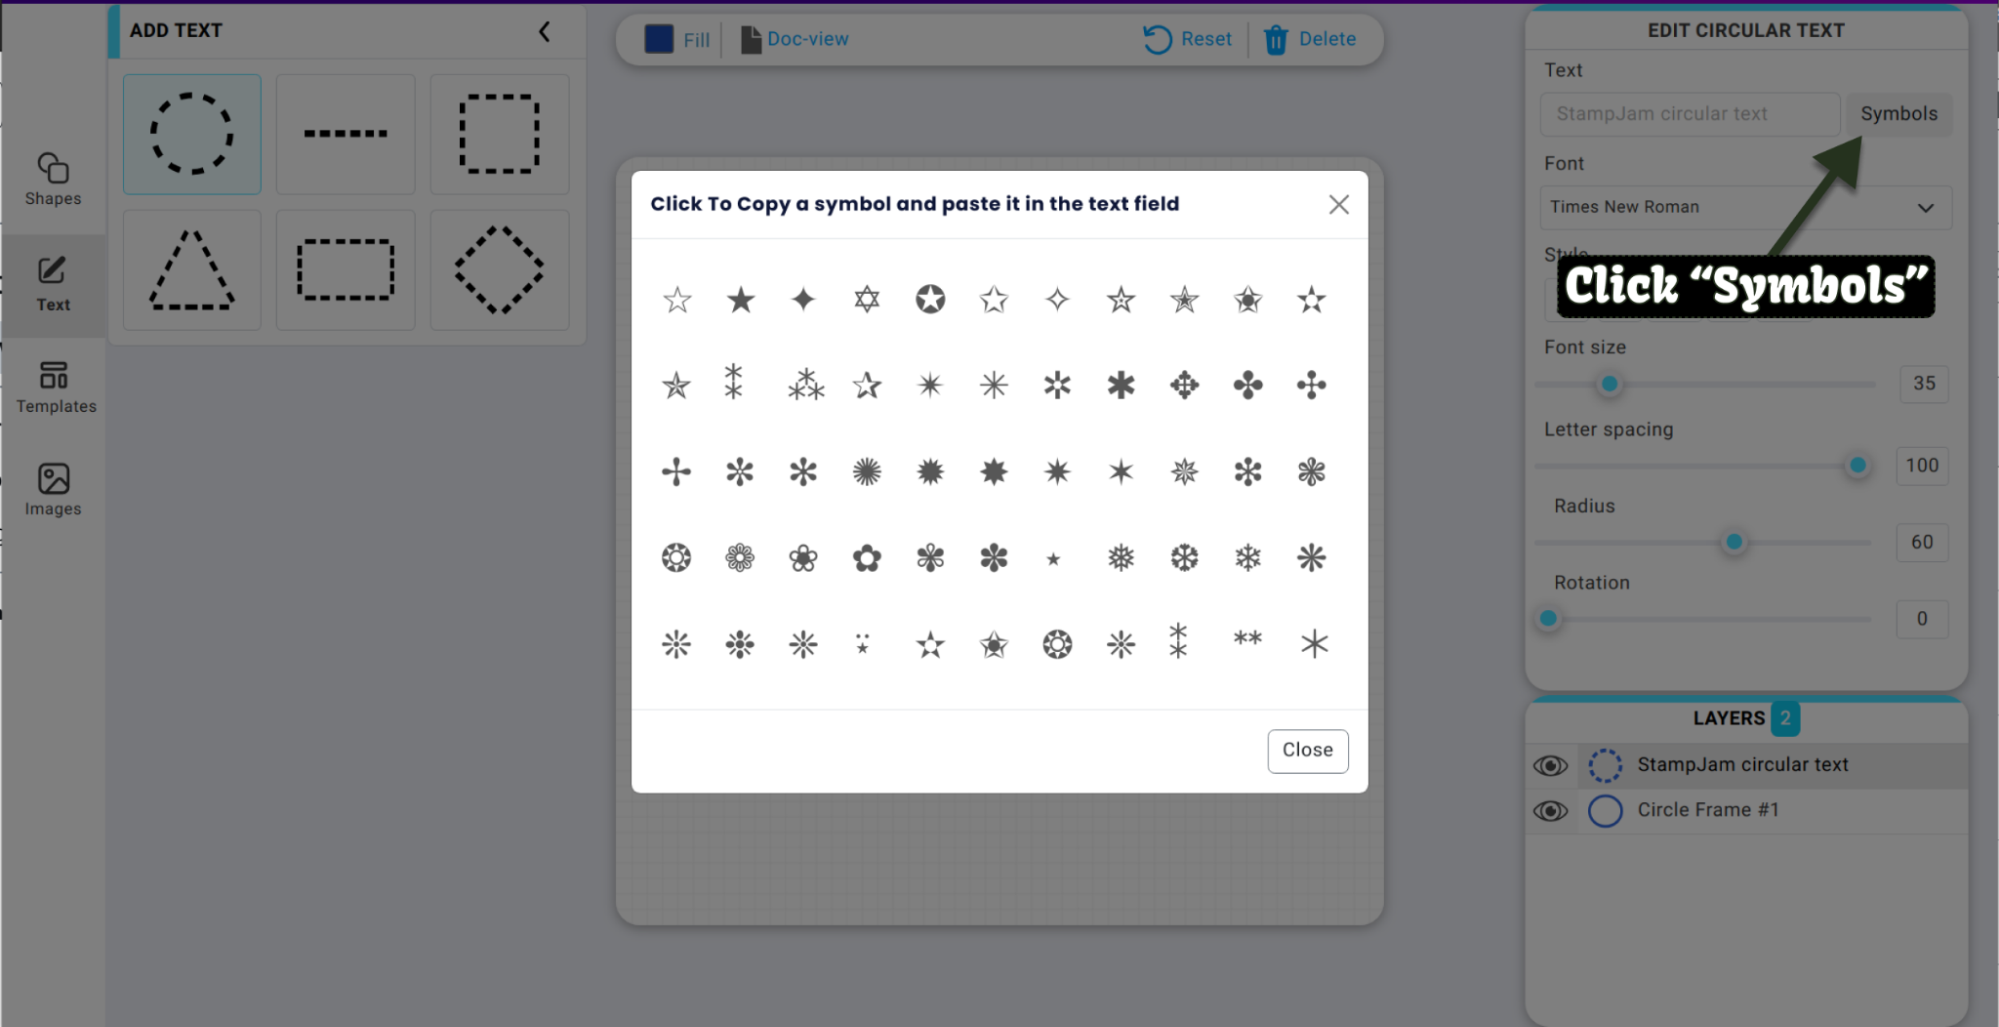
Sometimes when we add a circular text to our stamp, choose a font and font size, we may experience that the individual characters of your text begin to overlap each other. This is not an ideal situation especially when we need our business stamp to be as precise as possible. This phenomenon occurs because the entered text is too long to make a complete 360 circle. In such a case, to refrain from any input text overlap we have 4 options:
1. Decrease the length of the text by deleting some content (not always possible)
2. Decrease the font size of your text
3. Choose a different font (every font has different spacing between each letter).
4. Increase Letter spacing by dragging the slider right.
5. Increase the radius of the circular text to increase the gap between each letter
By performing any of the above changes, you will notice that the characters no longer overlap each other.
In conclusion, navigating the creative realm of stamp design has never been more
accessible than with StampJam.
This tutorial has equipped you with the essential skills to effortlessly craft your
personalized stamps.
From the intuitive interface to the myriad customization options, StampJam empowers
users to seamlessly translate their ideas into tangible, high-quality stamps.
With StampJam.com, the journey of turning your visions into unique stamps is both
user-friendly and cost-effective.
If you still need assistance using our Stamp Maker, please reach out to us at
[email protected].
Until next time, Happy Stamping!