How to Add a Stamp to a PDF Document

Introduction

Last updated: July 2, 2024 13:00 EST

Welcome to our tutorial where we’ll guide you how to add a Stamp to a PDF Document using our innovative tool - StampJam. Our PDF Stamper will let you add not just your digital stamps but also signatures, shapes, text and doodles to your documents.

Our PDF editor is thoughtfully organized into 4 distinct sections:
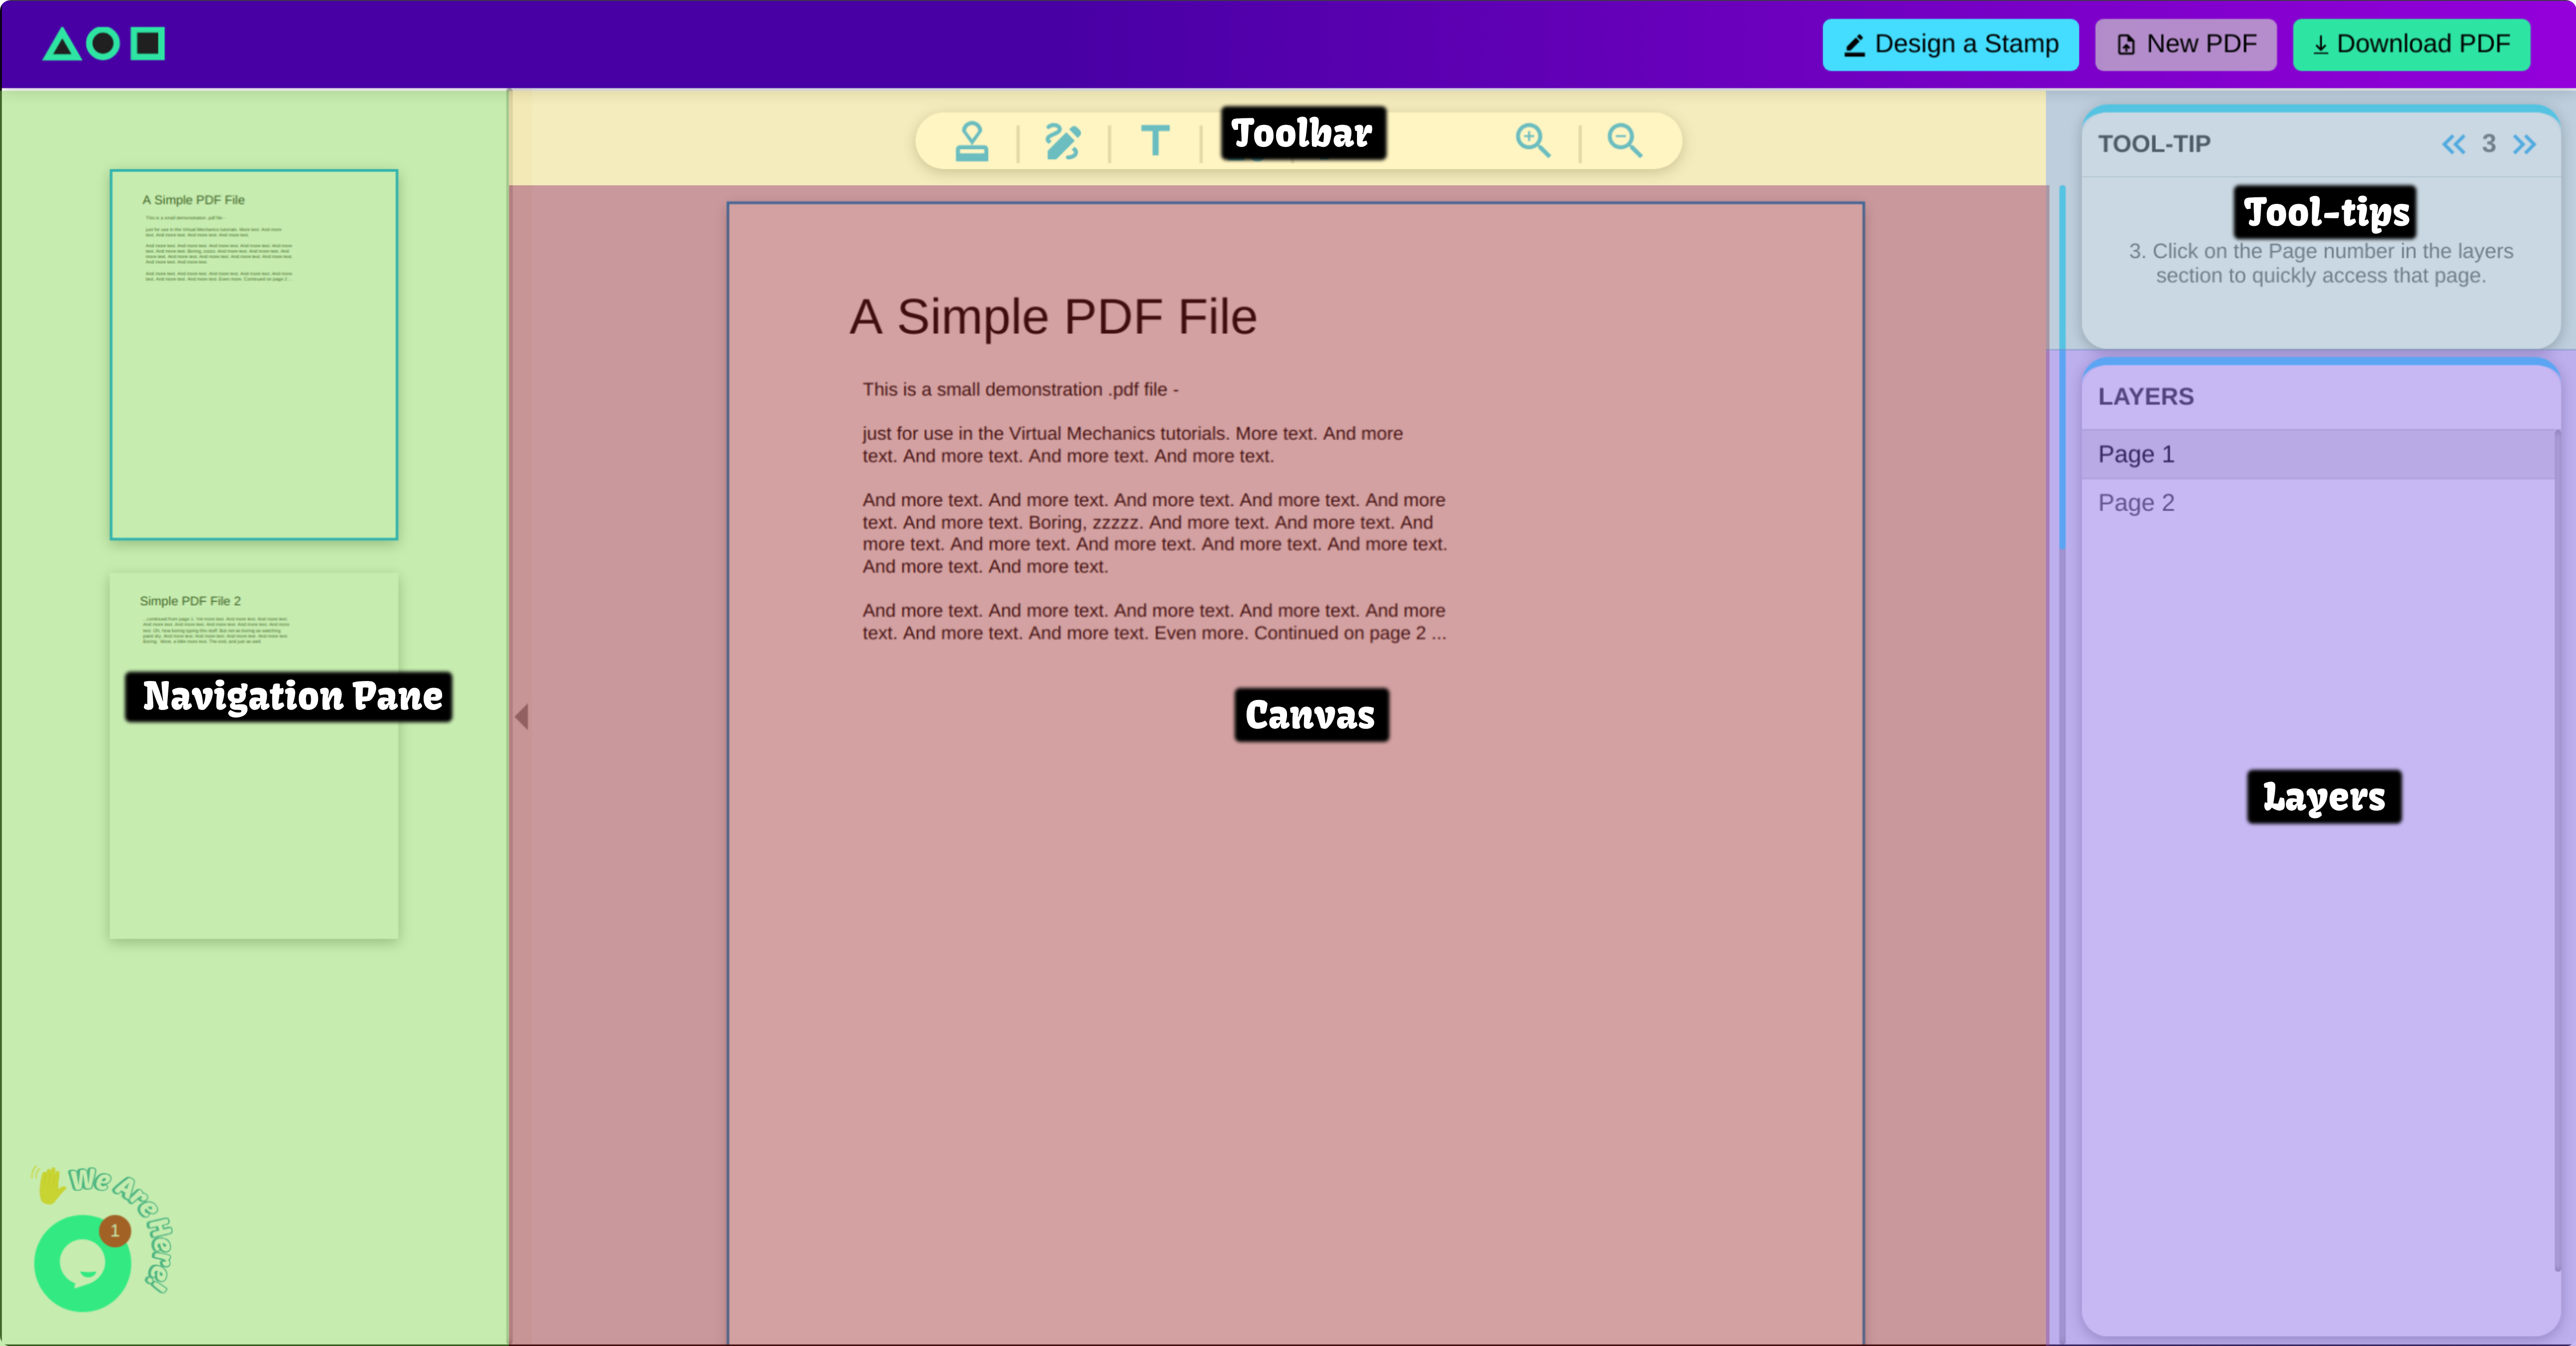
  1. Navigation Pane: Lets you quickly access any page of your document.
  2. Canvas: The center part of the screen where you can add/edit/delete individual elements from the selected page.
  3. Layers: Gives you a high level view of all the elements present on each page. Furthermore, it also lets you click on any page to bring it into view for fast editing.
  4. Toolbar: Lets you add various elements like a stamp, sign and various other elements which we will talk more about in the upcoming sections
How to add a stamp to a PDF Document

Pro Tip: Only PDF files are accepted.

How to Add a Stamp to a PDF Document – Complete Tutorial


Imagine being able to certify any document from your desk with no inkpad needed – at all. Let me show you how it’s done with a step-by-step process.

STEP 1: Upload Your PDF

First, upload your PDF. You can either drag and drop the file or click anywhere within the dotted square area labeled “Upload or drag and drop PDF”. Once you drop or select a document, a file dialog box will open and allow you to select a PDF from your device.

Once your document is uploaded, the webpage will load again to display your document on the screen, ready for editing.

If your PDF is password protected, a black pop-up box will appear on top of the screen and prompt you to enter the password once to access/edit that file.

Suggestion: Before uploading, make sure that your PDF is not password-protected so that you could avoid any interruptions. Here’s a free online tool to unlock your password-protected PDF.

STEP 2: Add and edit a Stamp

Now it's time to add a digital stamp to your PDF document.

Pro Tip: If you don't have a stamp, go to our app to create a customized digital stamp in minutes.

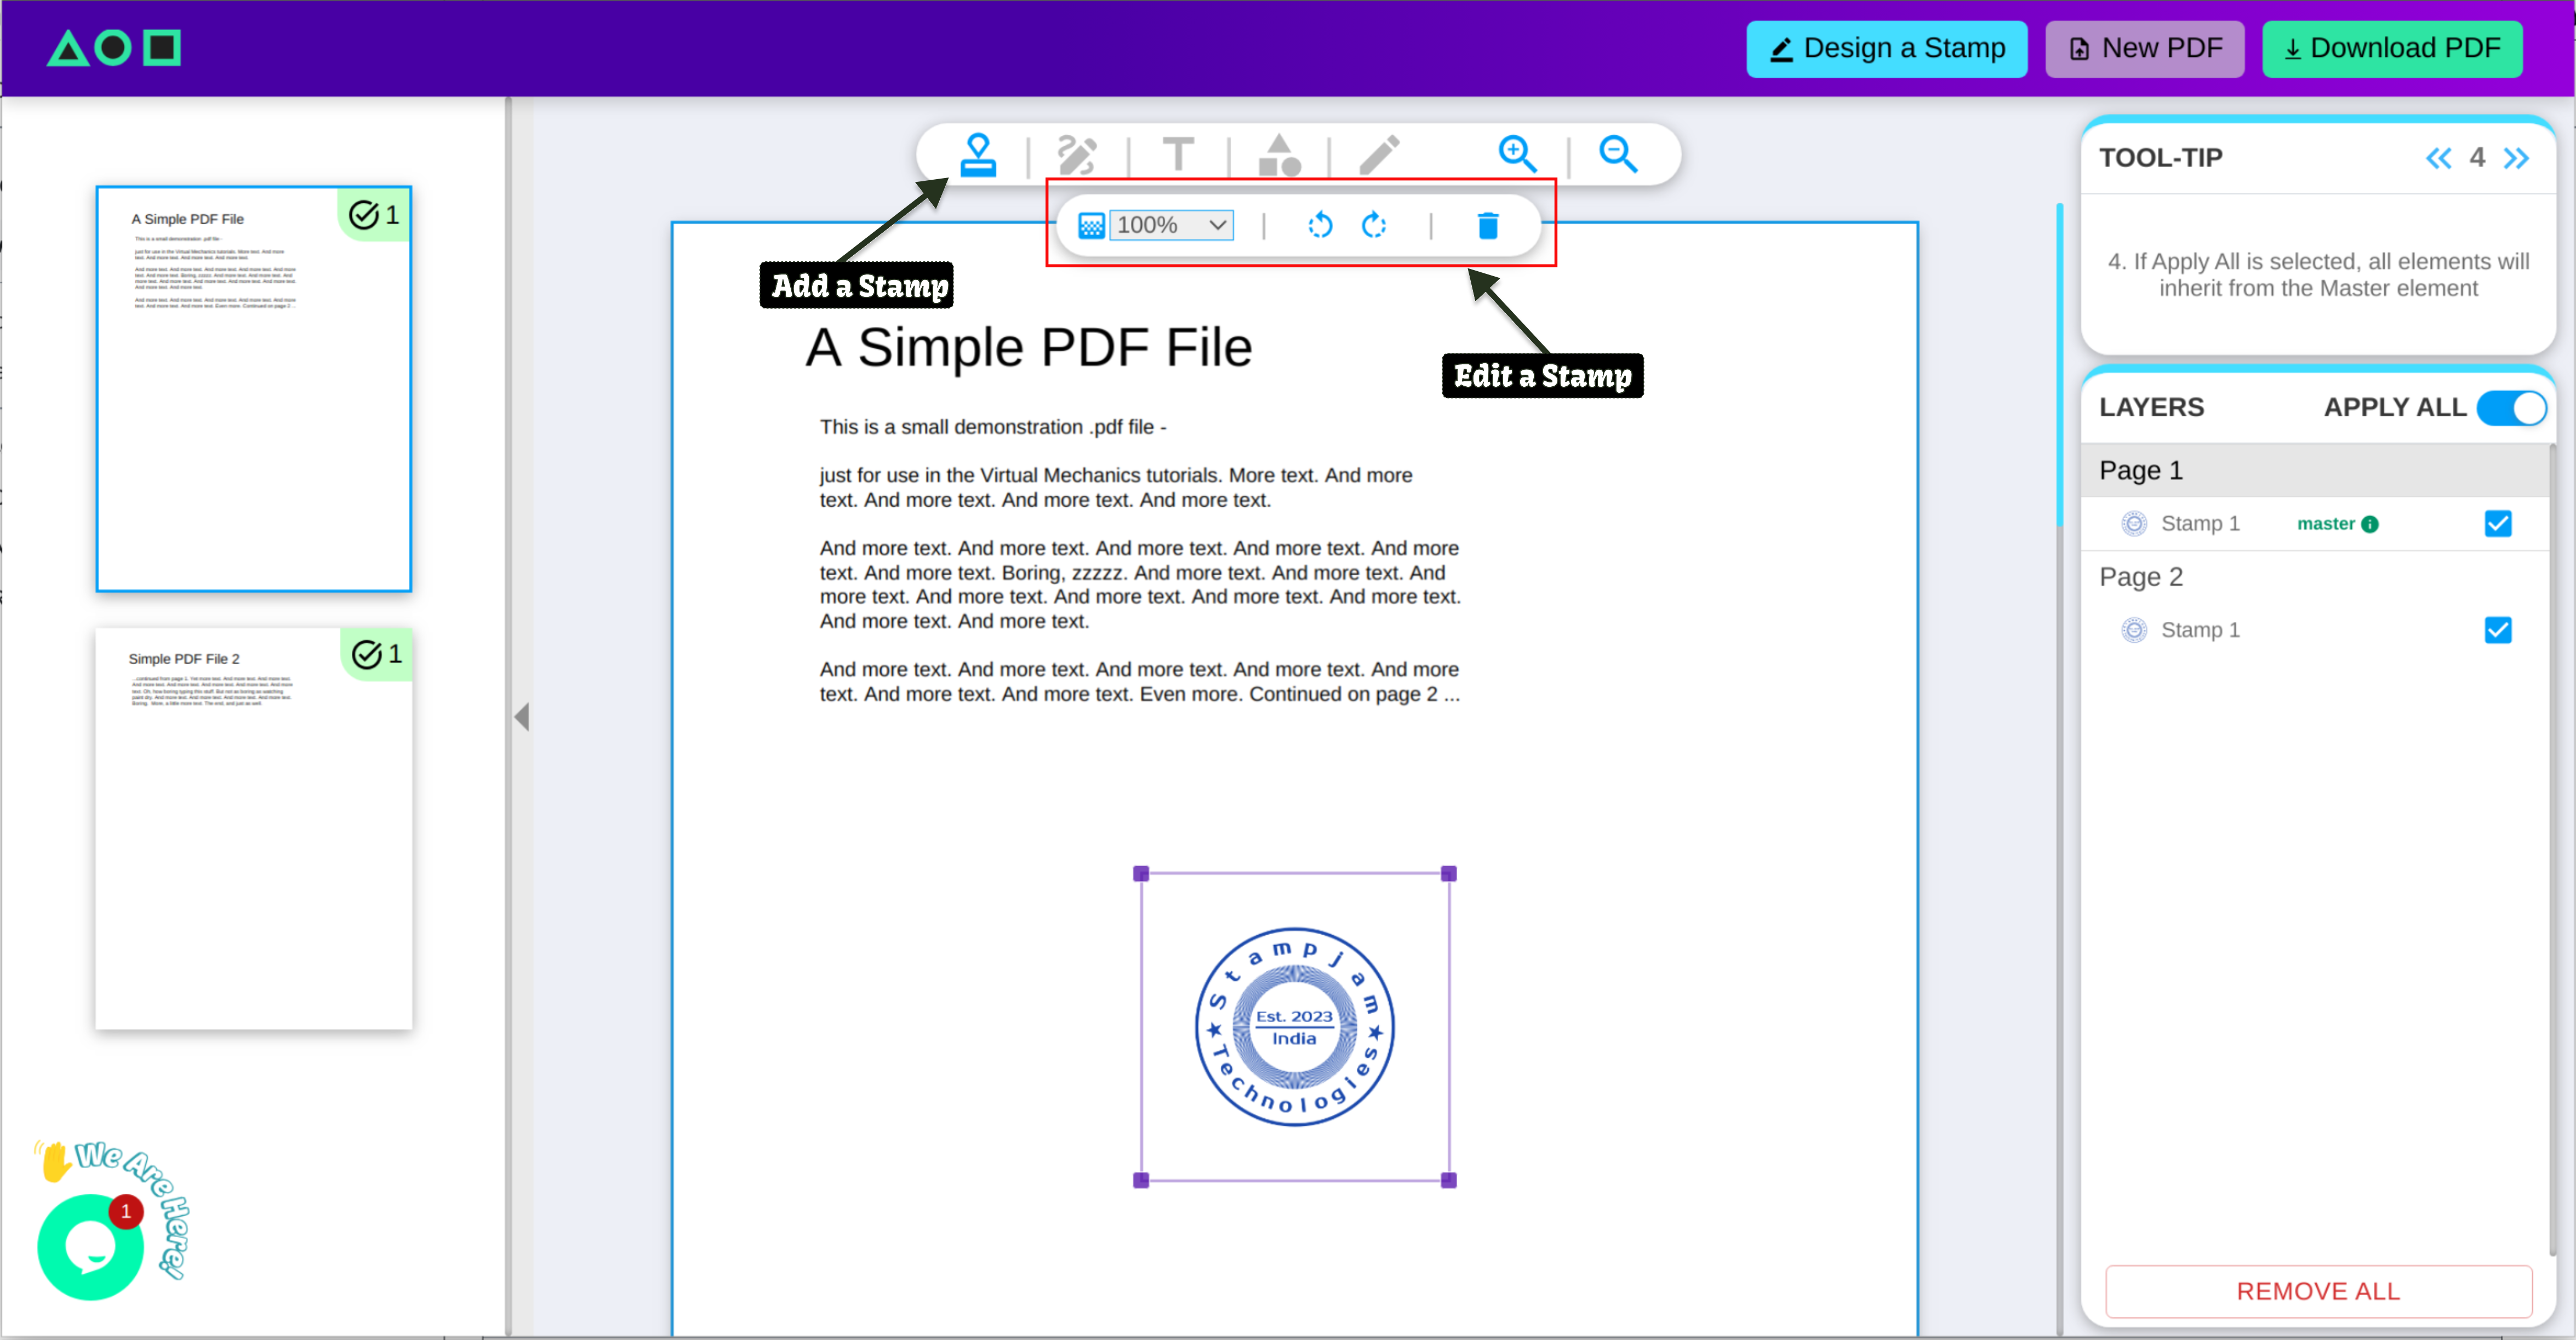
  1. From the toolbar, click on the first icon that resembles a “stamp”.
  2. A file dialog box will then pop up for you to choose the image you want to add. Select your preferred image and click “Open”. Your stamp design will now be uploaded into our app.

Important: Remember, only PNG images are accepted.

After your stamp image has been uploaded a pop-up notification will appear:

  1. Stamp All Pages: Let's you apply the stamp to all pages of the document.
  2. Stamp This Page: Let's you apply the stamp only to the current page.

If your PDF has only one page, this notification will not appear and your single page will be stamped automatically.

Now that you have added the stamp, its editing techniques will appear underneath the toolbar which allows you to edit the stamp. We have provided 3 editing techniques for digital stamps.

  1. Opacity: Set the stamp transparency. Default setting is set to 100%. If you want to make your stamp more transparent, reduce the opacity to 50% or 25%.
  2. Rotation: Rotate your stamp image counterclockwise to the left or clockwise to the right.
  3. Delete: Let's you delete your uploaded stamp.

The stamp position isn’t fixed. You can click on the image and drag to place it anywhere on the page.
How to add and edit a stamp in PDF Document

STEP 3: Add & edit a Signature

Now during the process on How to Add a Stamp to a PDF Document, let’s go ahead and add your signature to the PDF.

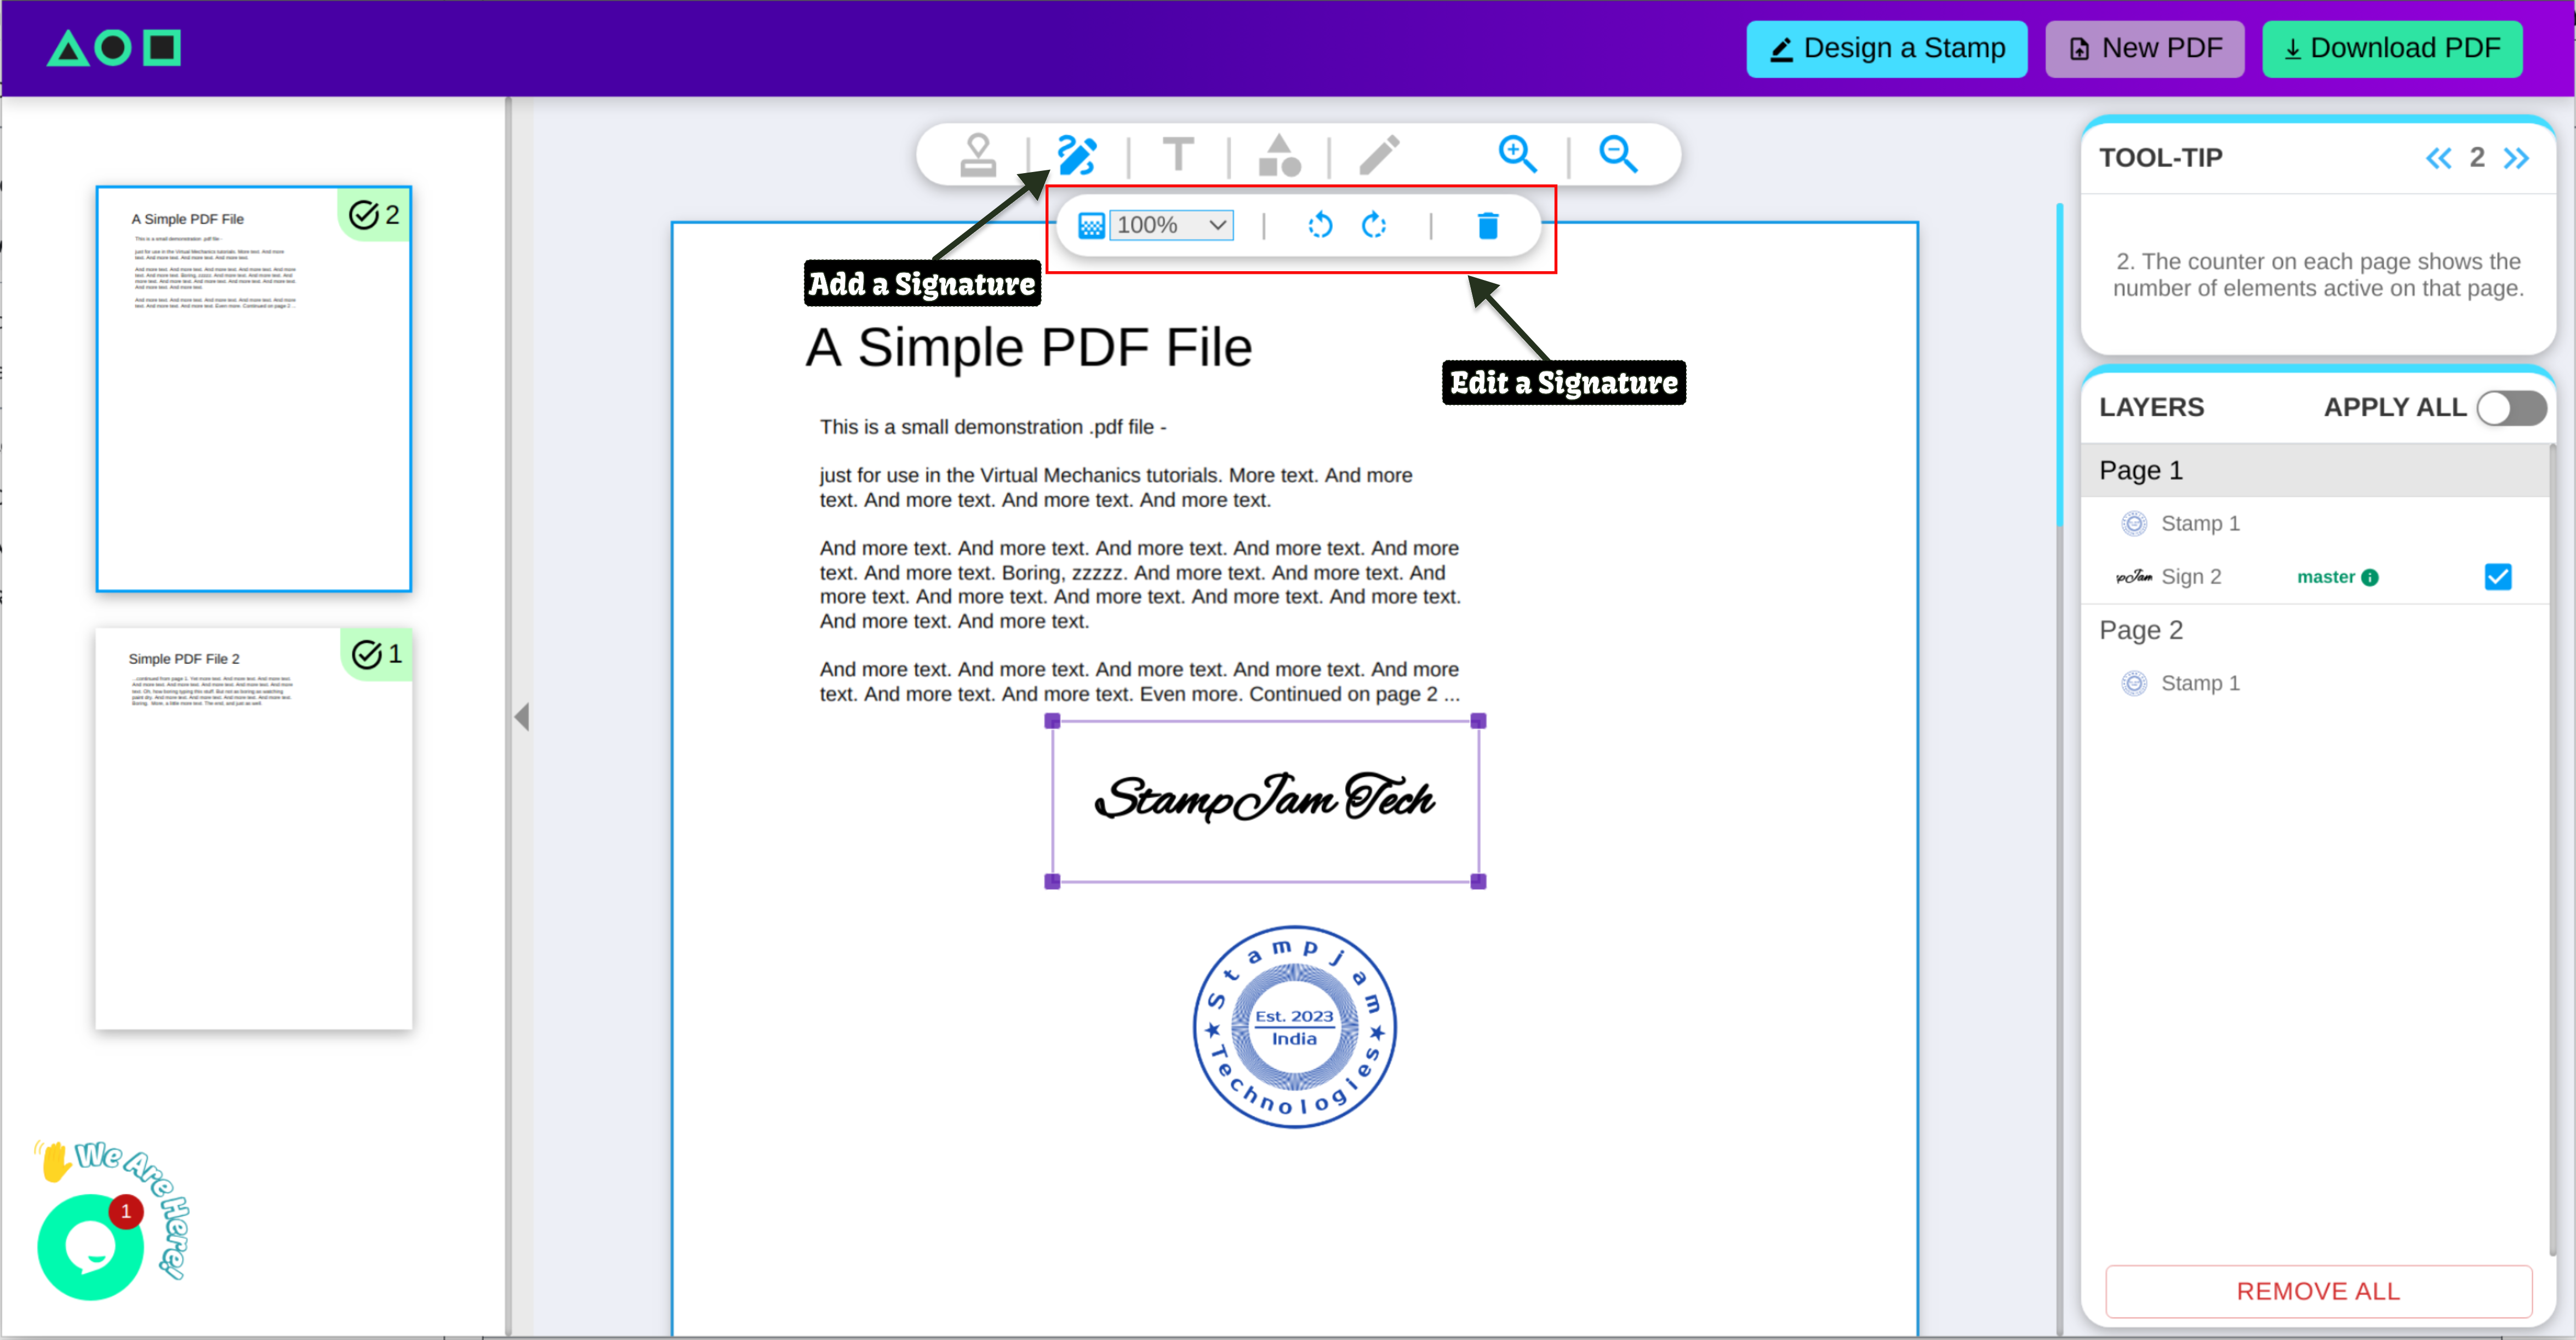
  1. Click the Signature Icon: Select the second icon on the toolbar, a pencil across a wavy line, to add your signature.
  2. Choose a Signature Method: Now choose from 3 ways to add your signature.

Note: With all three options, you can choose to “Sign this page” to apply the signature to the current page or select “Sign all pages” to apply your signature to all pages. This only applies to PDF documents with multiple pages. If your document has only one page, the signature will be added automatically.

  1. Upload Signature: This option lets you upload your own handwritten signature. Simply sign on a white piece of paper, take a clear photo, save it as a PNG file and upload it here.
  2. Type Signature: If you want to create your own digital signature, click on “Type Signature”. Now, simply type your name here, choose a font & color and add click “Sign this page” or “Sign all Pages”.
  3. Draw Signature: With this option you can draw your signature as you would on a piece of paper. Choose “Draw Signature” which opens up a blank canvas where you can create a free-hand sketch of your signature with your preferred stroke width and color. Drag your mouse or finger (for mobile users) to sketch your signature.

If the signature sketch you’ve drawn isn’t to your liking, simply click on “Clear Screen” to erase it and start over.
How to add and edit a signature in PDF Document

STEP 4: Add & edit custom text

The next step on How to Add a Stamp to a PDF Document is to learn how to add text to your PDF file:

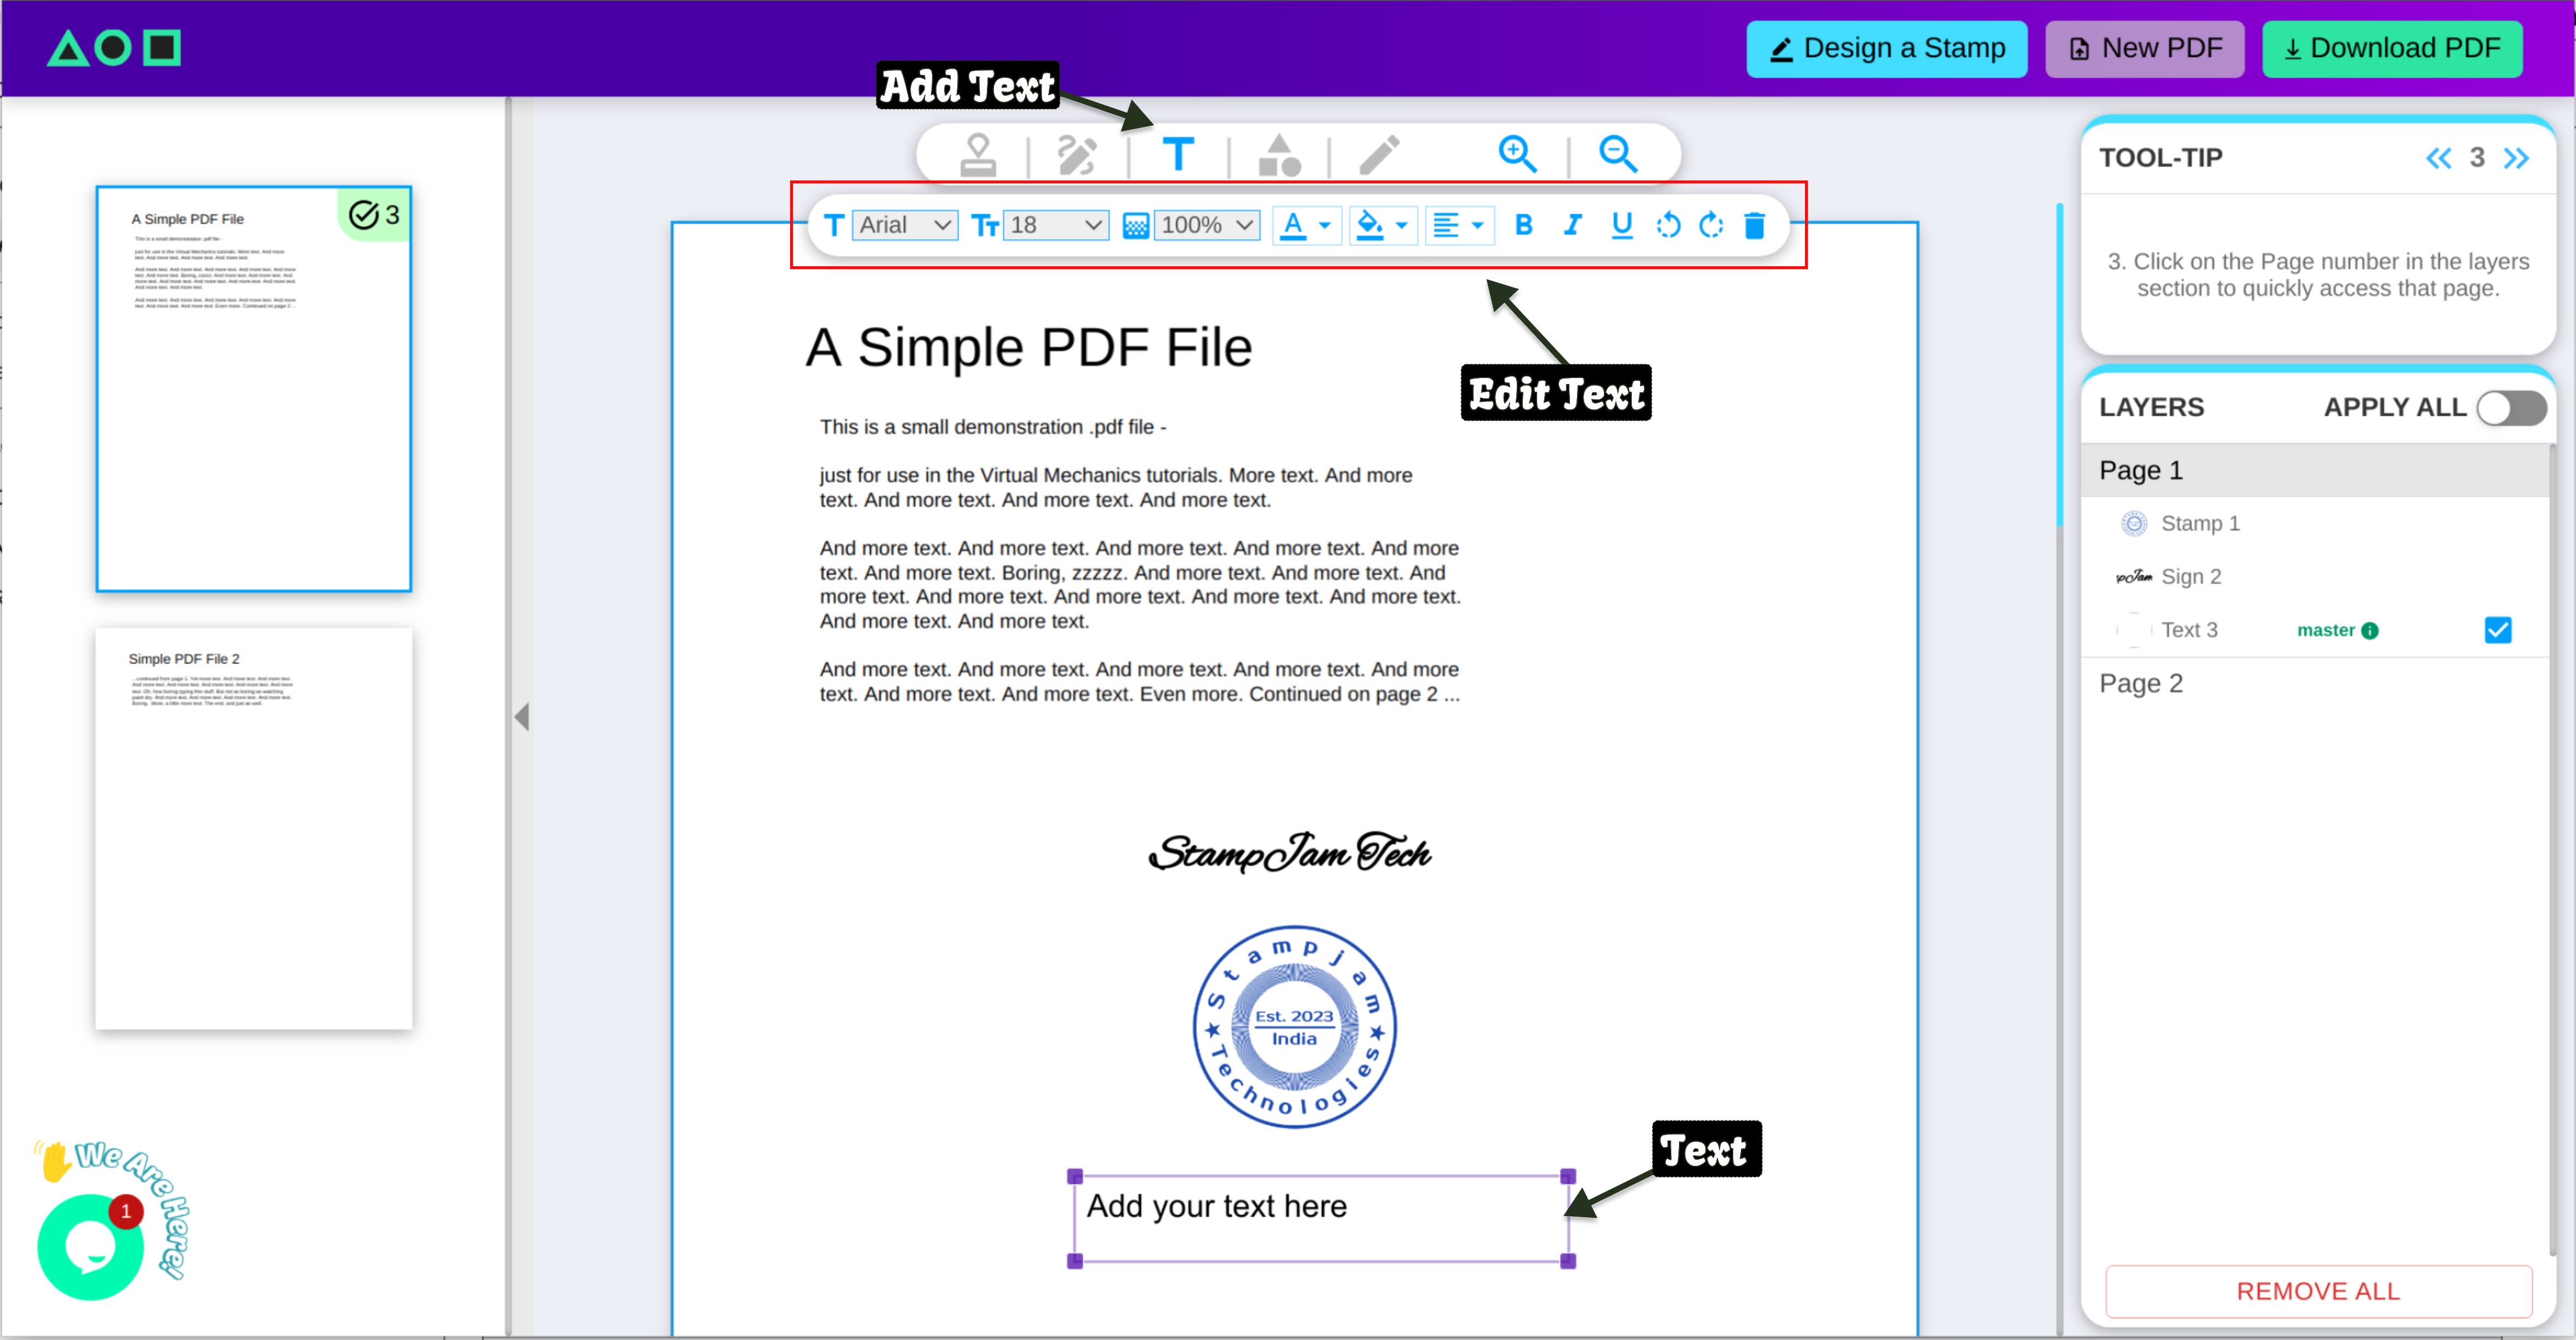
  1. Click on the ‘Add Text’ feature, which is the 3rd option on the toolbar with a “T” icon. A center-aligned text box will be added to the center of the page. Now enter your desired text before you start editing it.

    If your PDF has only one page, the text box will appear directly on the page but if your PDF has multiple pages, a pop-up will appear with options to “Apply to This Page” or “Apply to All Pages”. Select the one that suits your requirements.

  2. We have numerous options to edit your text.
    1. Font - Lets you choose from 5 font options.
    2. Font size - Lets you increase or decrease your font size.
    3. Opacity - Lets you increase or decrease the opacity
    4. Font color - Lets you choose the color of your text
    5. Background color - Lets you choose the background color for your text
    6. Alignment - Lets you align your text left, center or right.
    7. Styling - Lets you style your text by making it bold, italic or underlined.
    8. Rotation - Lets you rotate your text counterclockwise (left) or clockwise (right)
    9. Delete - Lets you delete your added text.

    Just like stamps, you have the option to drag and place your customized text anywhere on the page.
    How to add and edit text in PDF File

STEP 5: Add & edit shapes

The next part on How to Add a Stamp to a PDF Document is learning how to add and edit a shape on your PDF

Here’s how you can do it:

  1. Click on the “Add Shape” icon which will open a small pop-up menu that will have three shapes (round, square, line) to choose from.
  2. Once you have chosen your desired shape, click “Add shape to this page” which will add that shape to the page in view. Clicking on “Add shape to all pages” will add the shape to all the pages. Now, drag and place the shape to your desired location.
  3. It’s time to customize the added shape. You can adjust the stroke width, set the opacity, border thickness and choose your preferred border and background color as needed. As with other features, you can also rotate or delete your added shapes as needed.

Pro Tip: You can use the shapes to hide or redact any sensitive text/signatures etc. in your PDF.
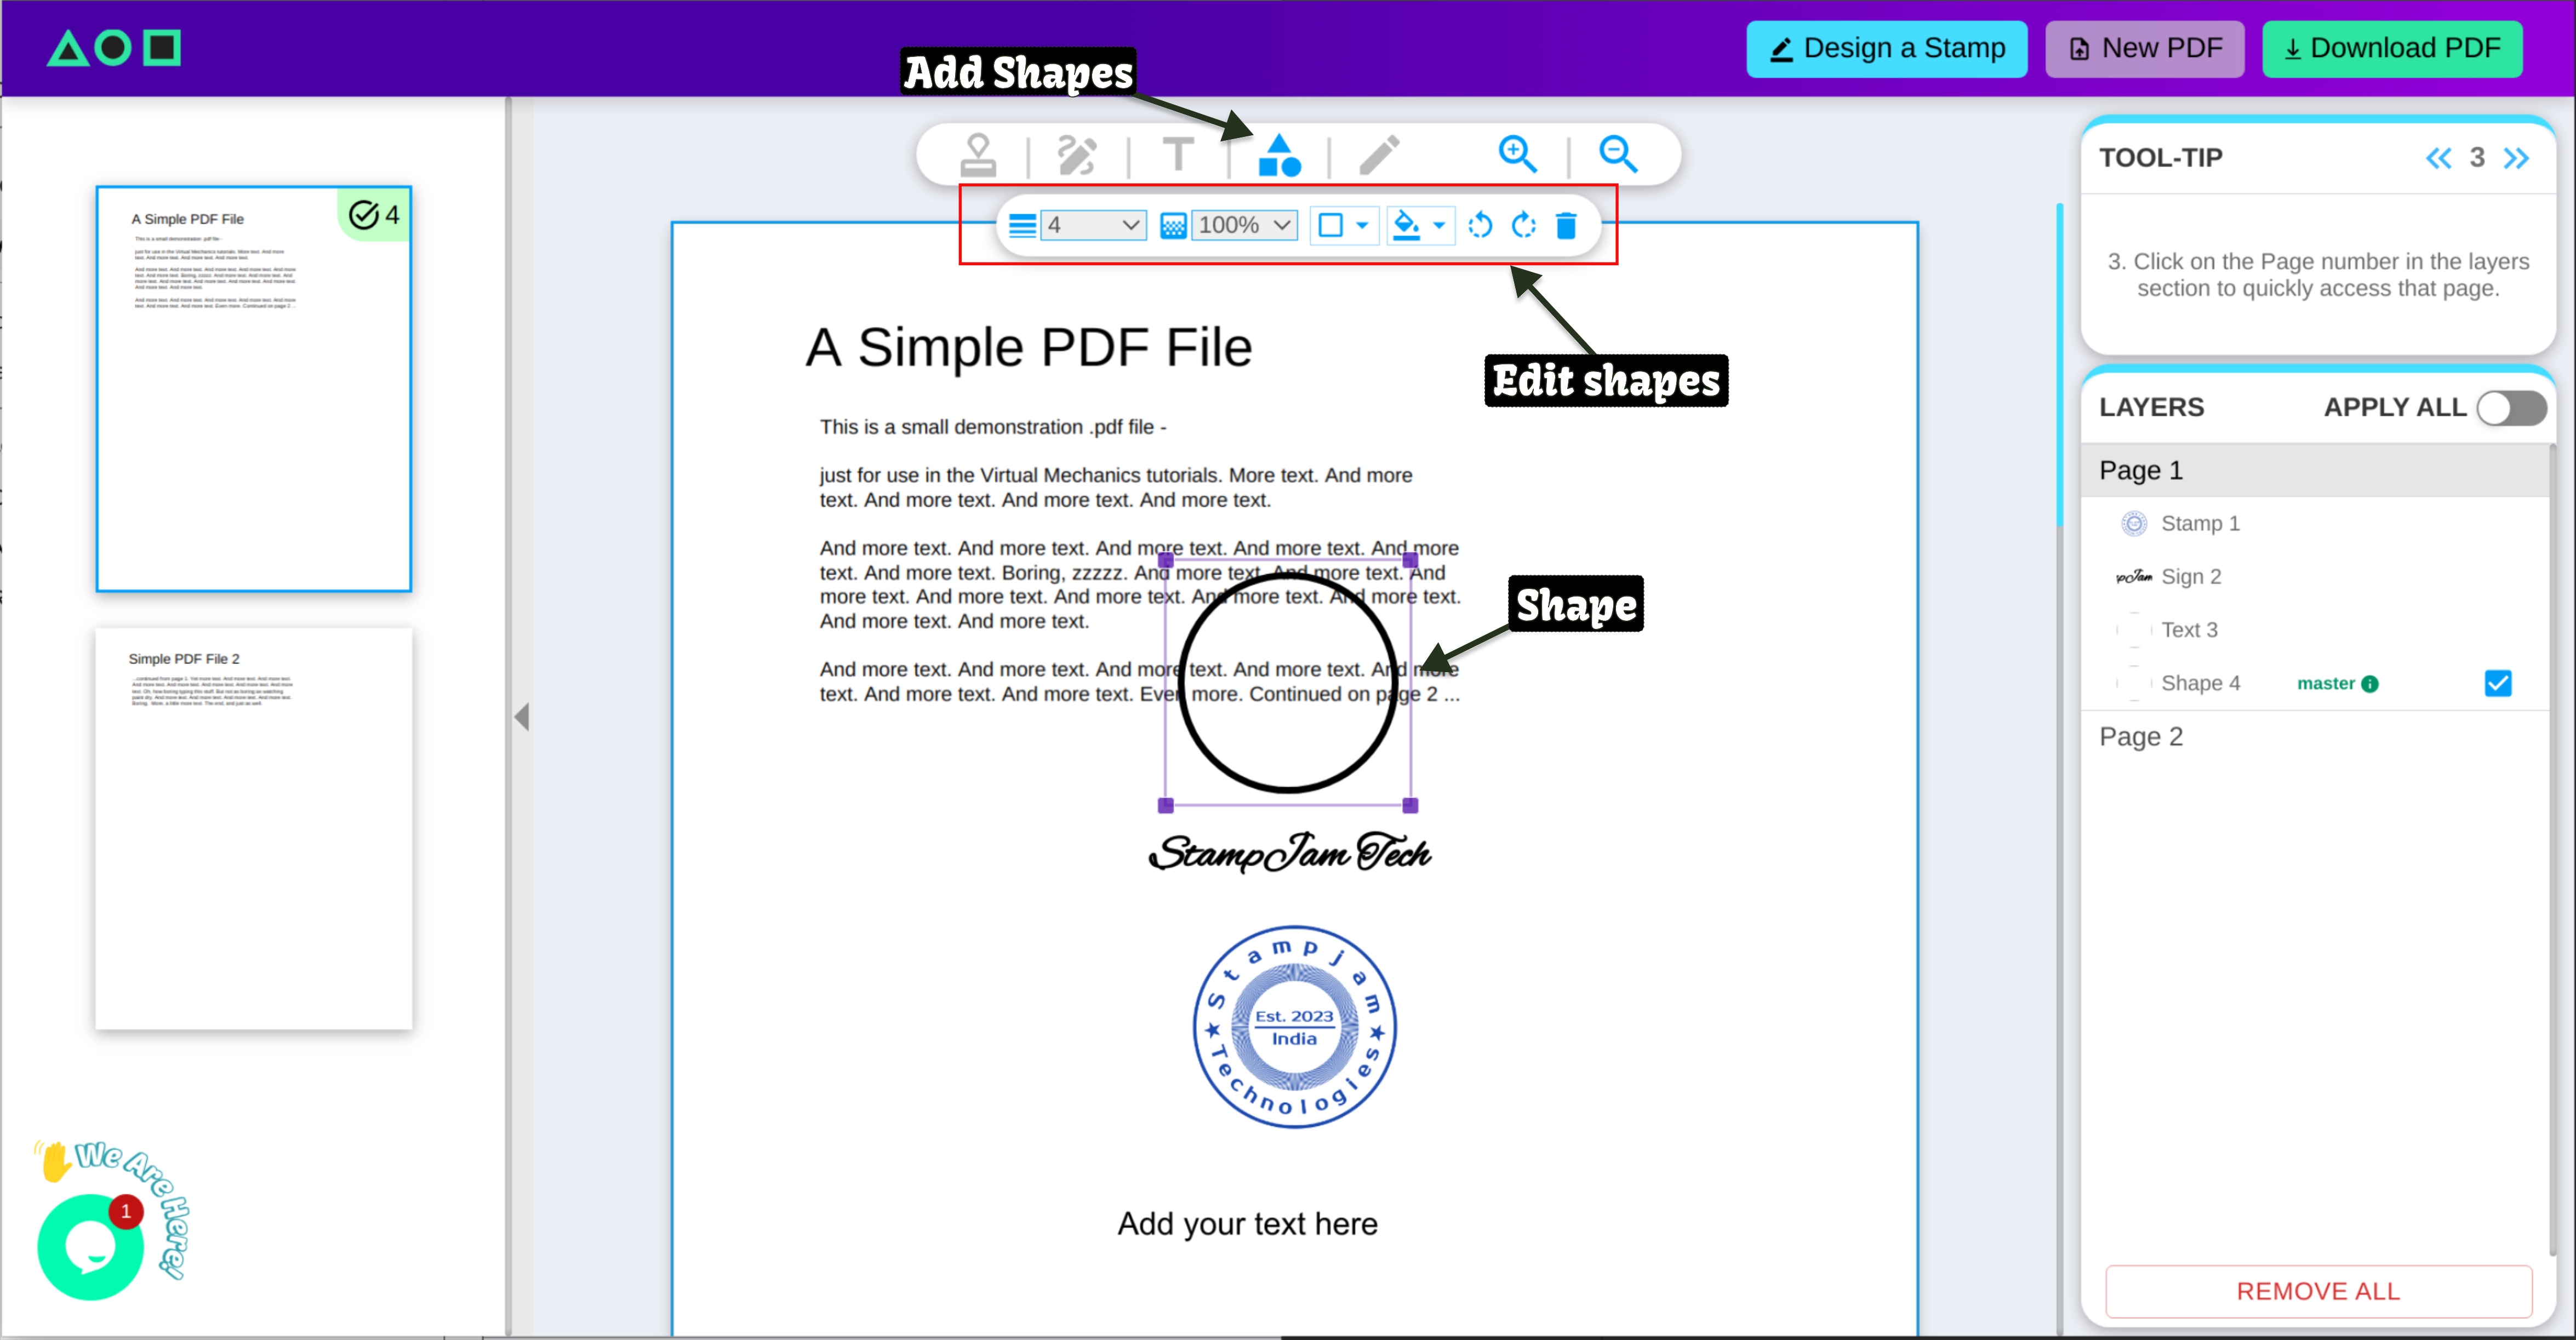
How to add and edit shapes in PDF File

STEP 6: Add & edit a sketch

This feature allows you to “Draw” on any page of the document.

  1. To start drawing click on the pencil (✎) icon on the primary toolbar. Once clicked a crosshair will appear on the canvas for freehand drawing.
  2. Now use your mouse, finger/stylus pen (mobile and tablet users) to draw on any page of your document.
  3. We have provided a stroke size and color option to style your drawing. Furthermore, you can also “Undo” your drawing if you need to correct a mistake or click “delete” to start over.
  4. Once you have your desired sketch, click the “Tick” or click outside the sketch to apply it to your document. If you do not click this button or click away, your sketch will not be applied to the page.

Zoom In and Out

Clicking the “Zoom In” icon will increase the view size of your canvas while clicking the “Zoom Out” icon will decrease the view size.

Both of these options will give you a better overview of your document and help you review the entire page layout along with the elements added. You’ll be able to see if every stamp, shape and text is in place and nothing is spilling over or unaligned.
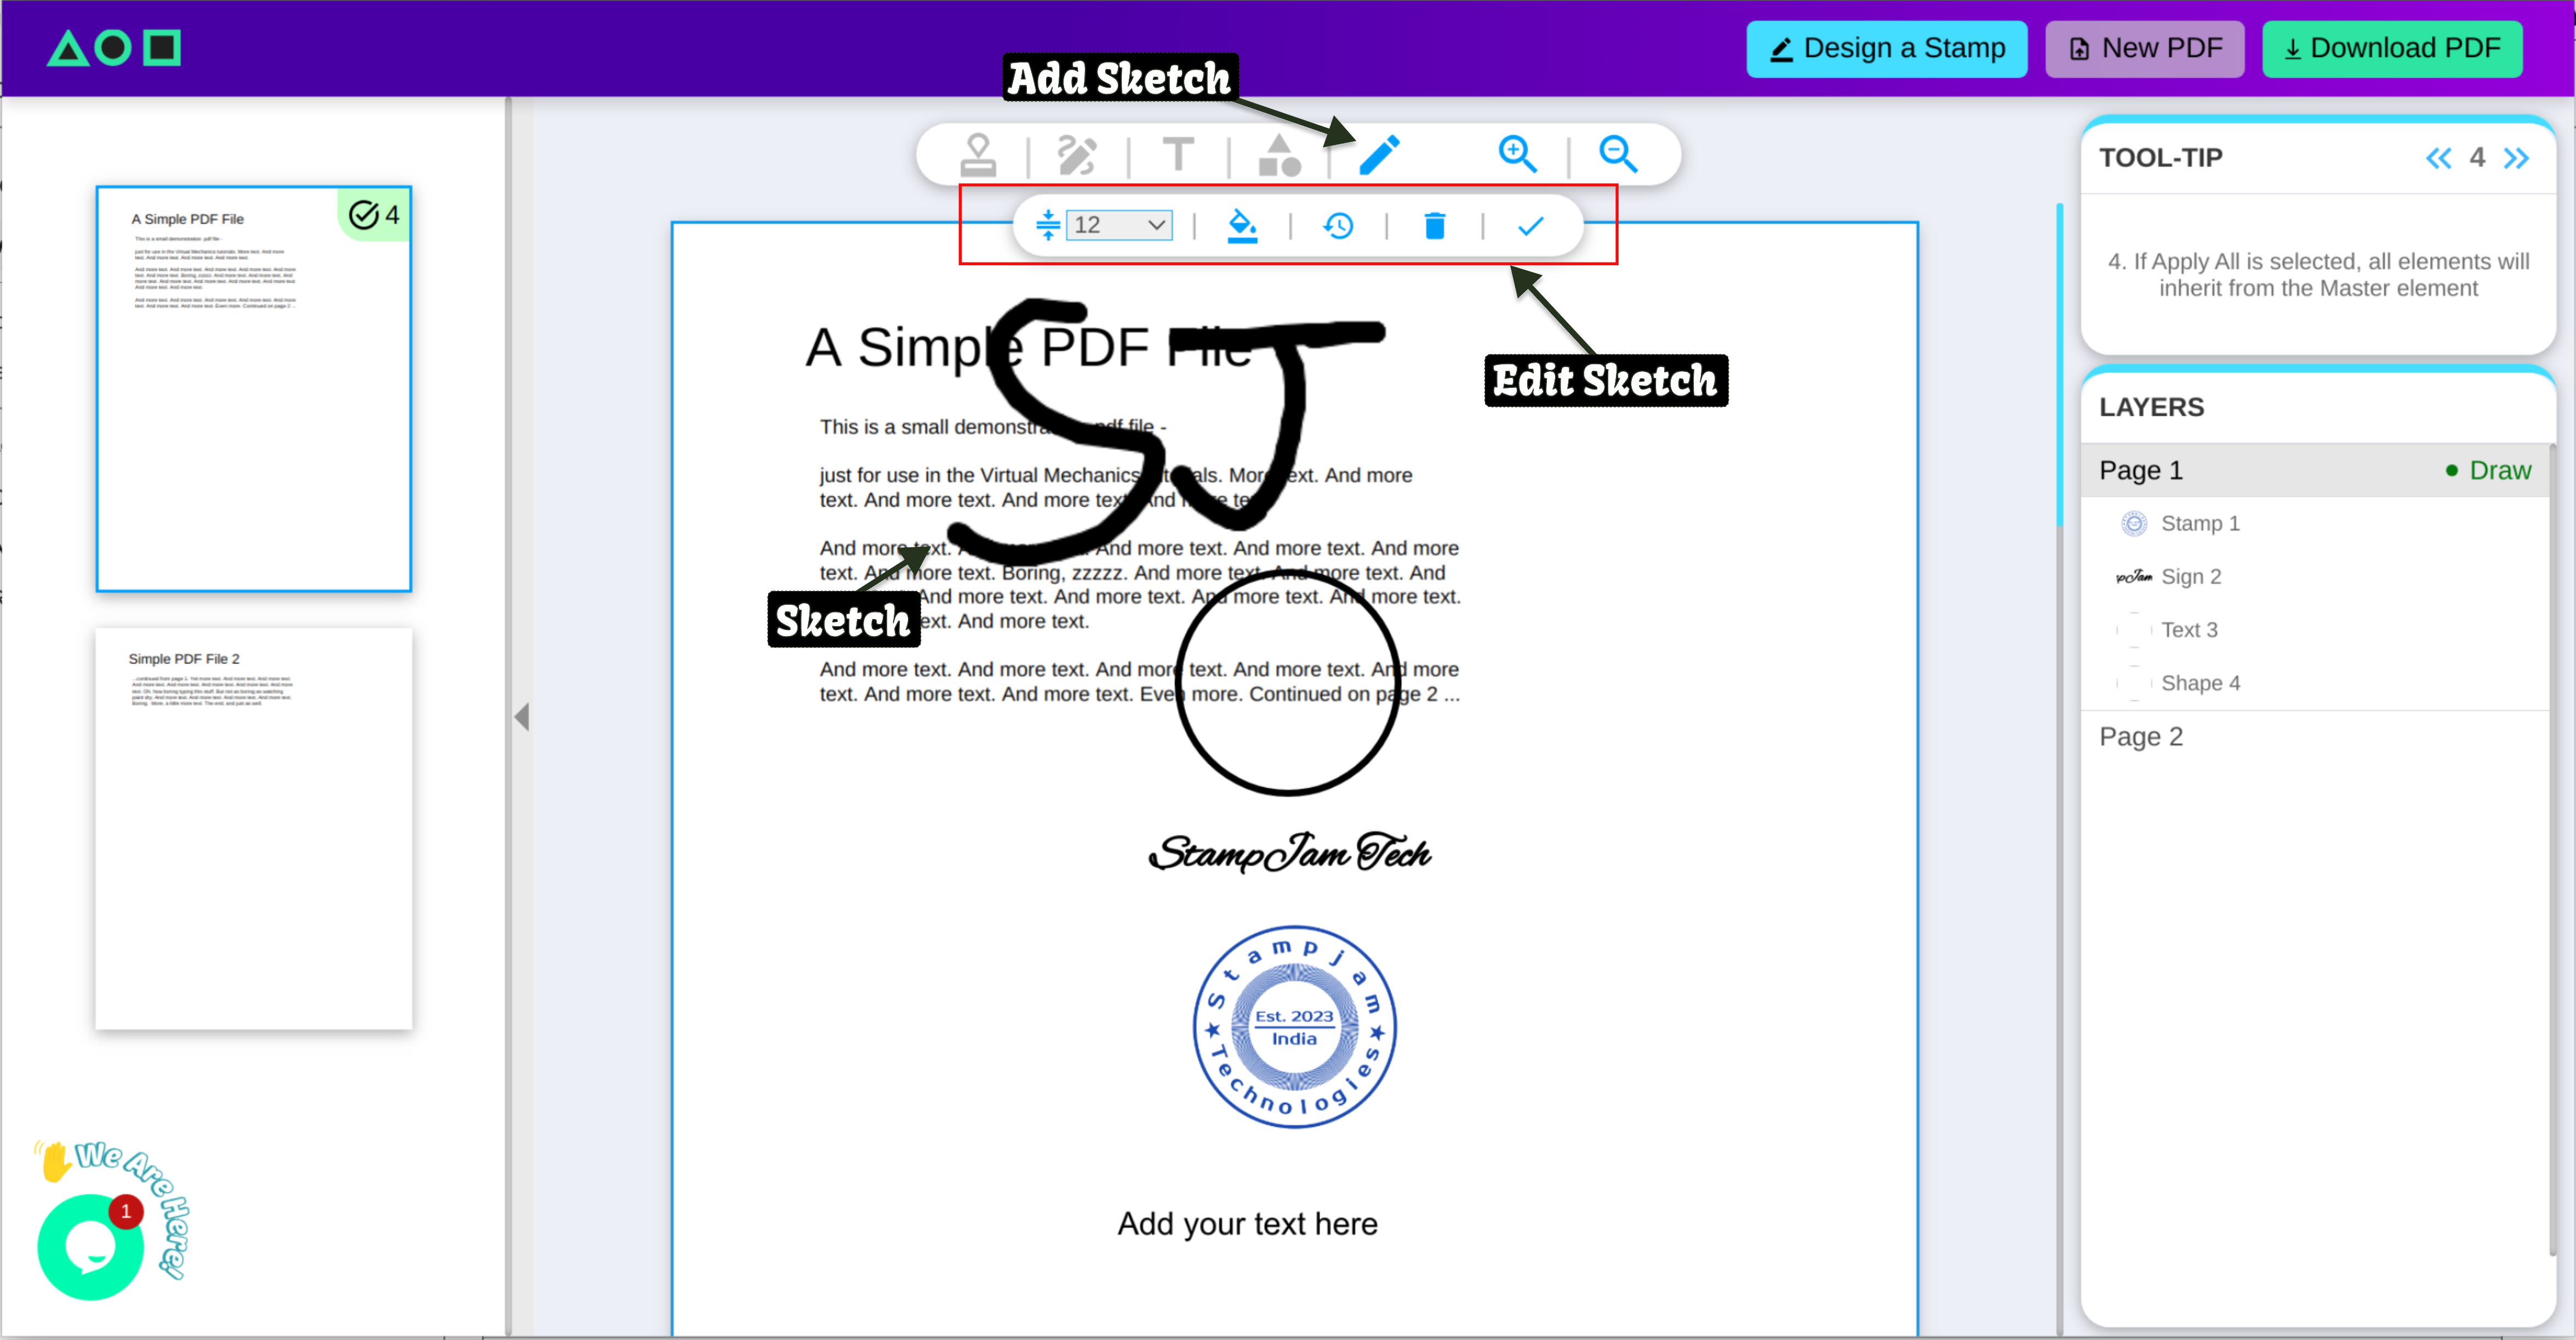
How to add and edit Sketch in PDF Document

STEP 7: Layers

Now that you have added your stamp, sign, shape, text and drawings, it’s time to understand how to use the “Layers” section.

Layers represent the number of elements present in your PDF document page by page.

Here’s how you can take advantage of the layers section:

  1. Access a Page: This feature is especially useful if your PDF document has multiple pages. The section will enlist all the pages in your PDF. Click on a page number to access it and bring it into view in the center of the screen.
  2. Manage Elements: Below each page number in the Layers section, you'll find a list of all elements you've added to that page, such as stamps, text, shapes, sketches or signatures.
  3. Using the Master Feature: In multi-page PDFs, the 'Master' element feature will help you to synchronize changes across the same type of element throughout the document. Click on an element on any page to set as the “Master” (once you click on it, the “Master” tag will appear for that element in the layers section. This will essentially make that specific element act as the template or “Master” for all the other elements of the same class.

    For example, if you have added a stamp, edited its size, position or rotation and want to apply these changes to “ALL” the other stamps, the “Master” stamp will serve as a template.

    Important: The “Master” feature will only work if you enable the “Apply All” switch. In this case, any changes you make to the Master element will automatically apply to all corresponding elements on all the pages of your PDF.
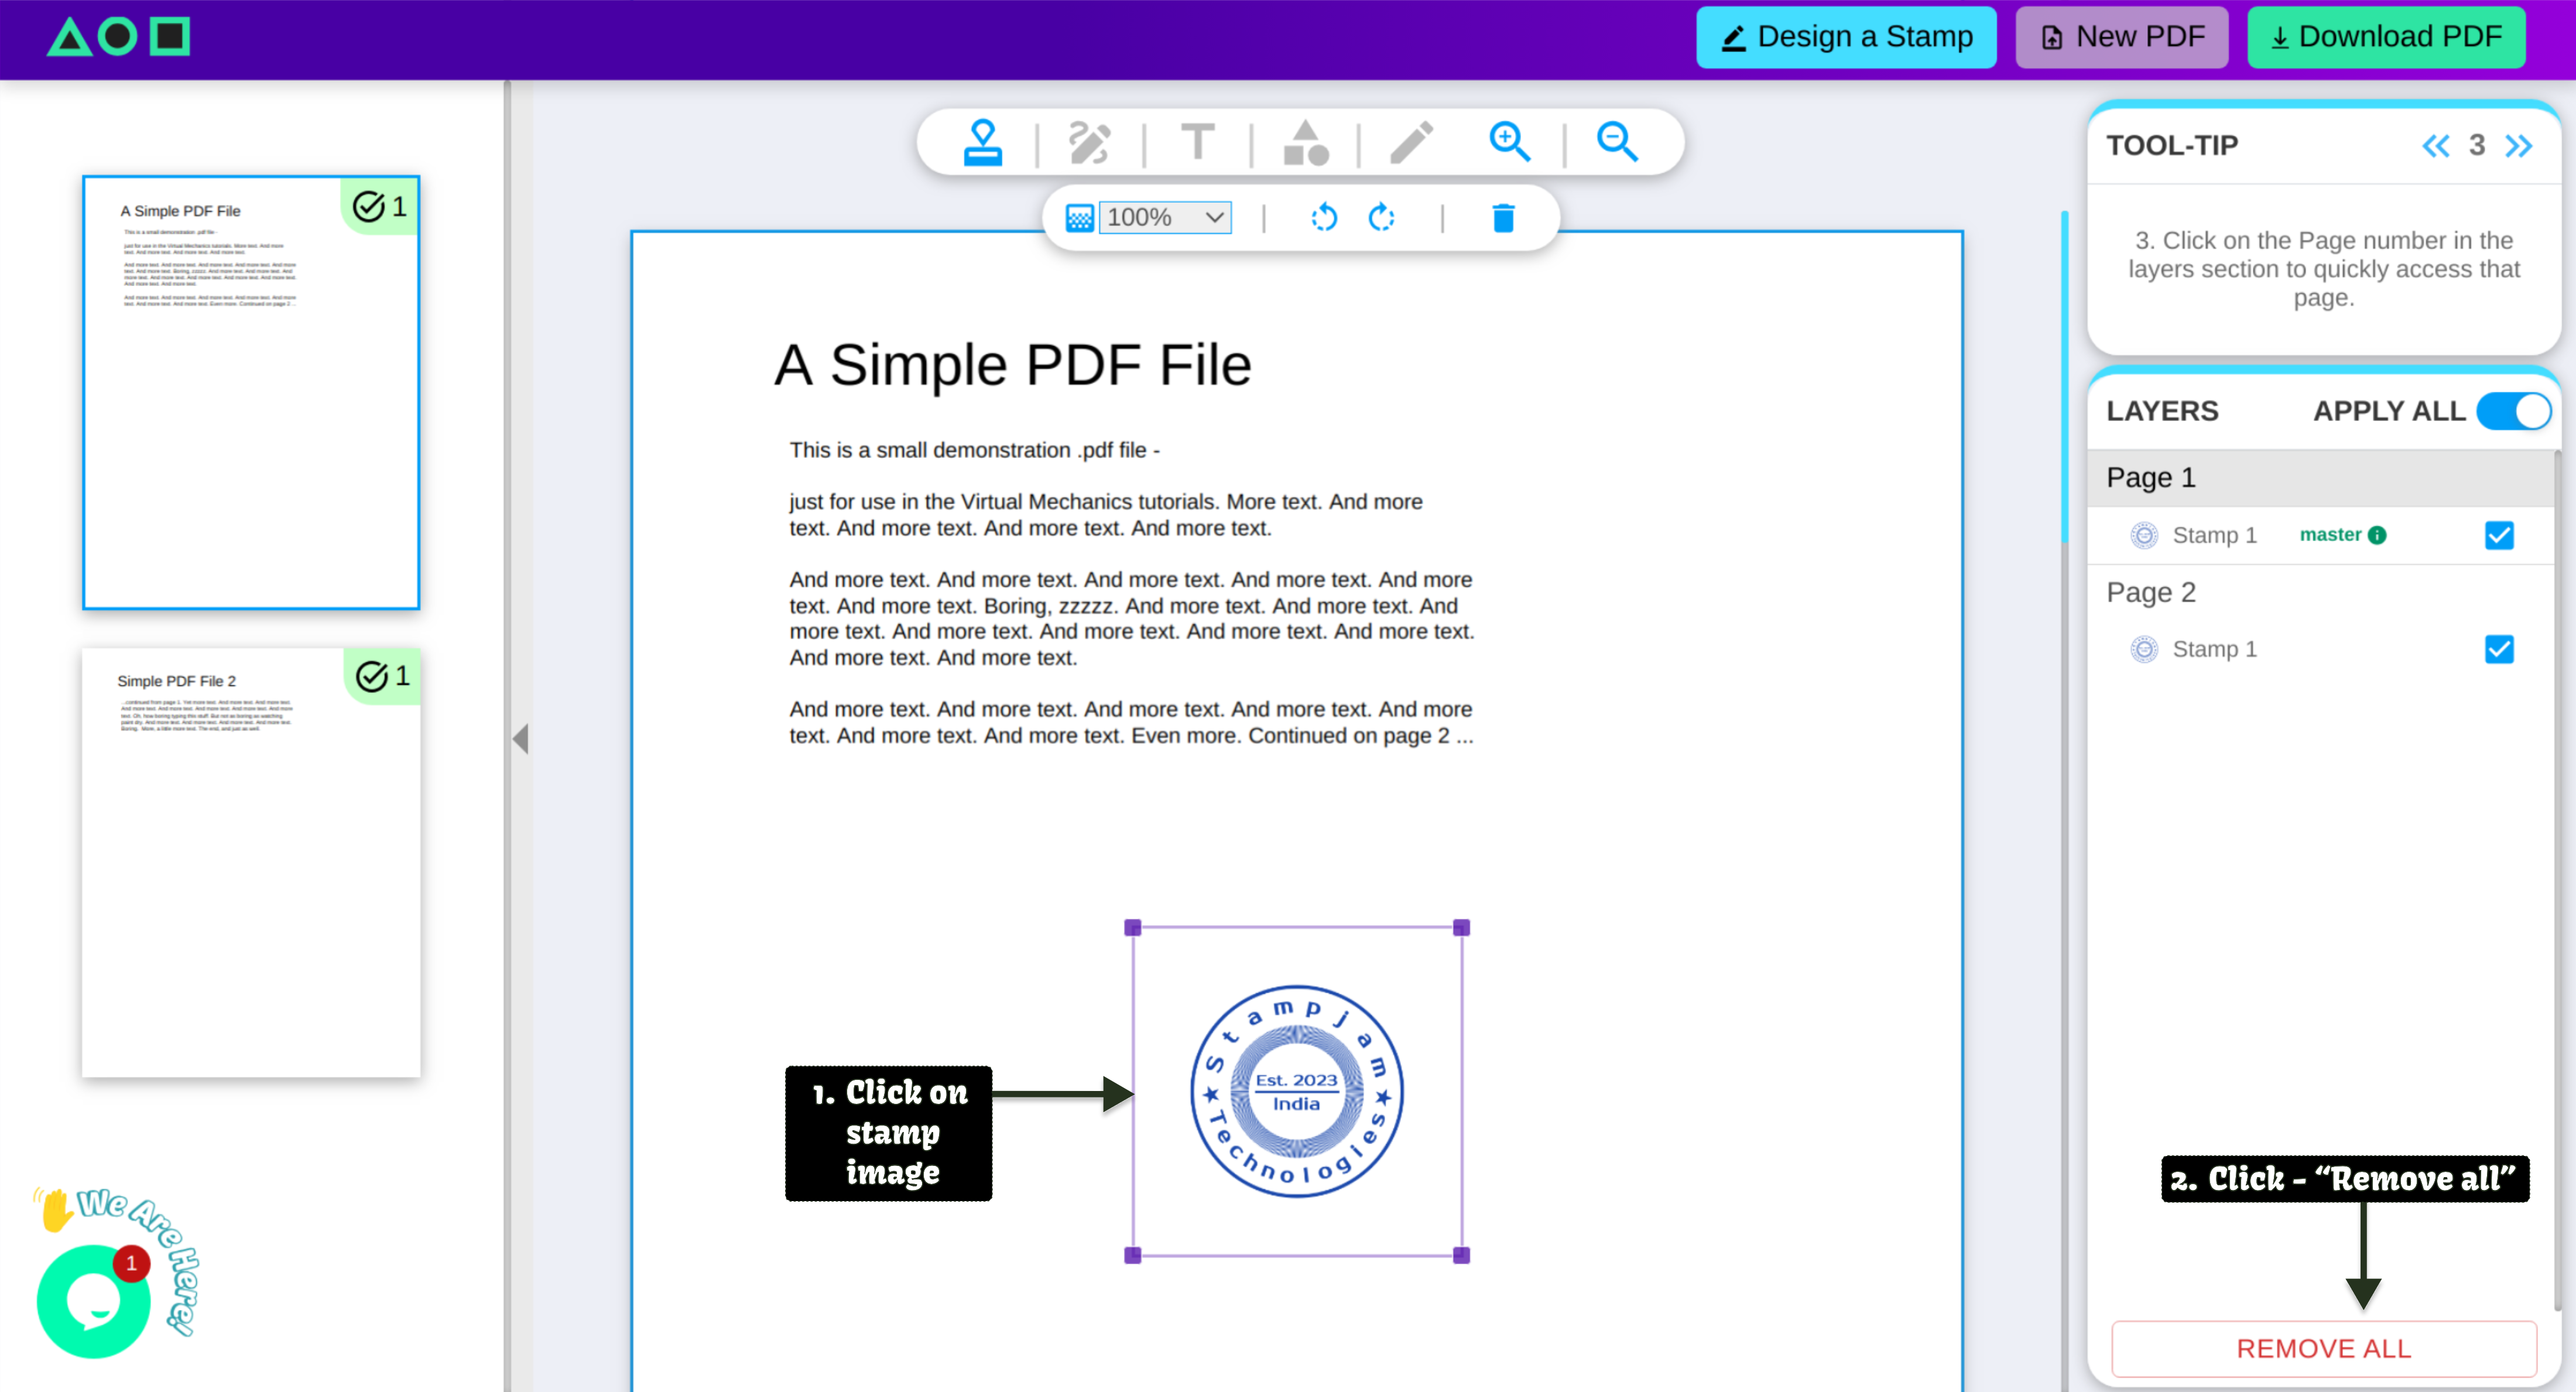
  4. Remove all: This feature lets you delete all instances of an element from all pages. For example, if you have added a stamp to more than one page, click on any one of the stamps and then click "Remove All". This will remove the stamp from all the pages.

  5. How to delete All Stamps from PDF File

STEP 8: Navigation Pane

The navigation pane appears on the left side of your screen as soon as you upload your PDF. This section serves as a navigational aid that will display the thumbnails of all the pages in your document to make it easy for you to go directly to your preferred pages for any edits.

For your convenience, we have added a dynamic counter of all the active elements on every page to the top-right corner of the corresponding PDF page in the navigation pane. As you add or delete an element from any page, the dynamic counter updates accordingly.

Tip: To hide the navigation pane, click on the left arrow. This will dedicate the entire screen to the Canvas.

STEP 9: Download PDF

Now you know how to add your stamp, signature, shapes, text and doodles to a PDF document.

Once you are satisfied with your PDF, it’s time to download it.

  1. Start the download by clicking the “Download PDF” option at the top right of the screen > enter a valid email address and then click “Proceed”.
  2. You will now be redirected to another page where you’ll see three options: Download, back to work and stamp new PDF. Click on the “Download” button now if your PDF is ready to go. If not, click “Back to Work” to continue editing it.
  3. If you decide not to edit it further, click “Download”, Wait for a second while our system prepares your document. A file dialog box will then open that let’s you choose the desired location to save your file. Click “Save”.

Conclusion

Aaaaand that’s it. You’re now well equipped on How to Add a Stamp to a PDF Document with StampJam. Don’t forget to like, subscribe and click the bell icon so you never miss our videos.

We are absolutely buzzing to know which feature you’d like us to add to our PDF Stamper next. We value your convenience, which means we value your feedback as well.

So tell us your thoughts about this service on the Feedback Pop-up Screen after downloading your stamp and don’t forget to give us a shout on your social media.

And if you ever feel stuck anywhere, don’t hesitate to reach out for immediate assistance via our live chat or email us at [email protected].

Till then, happy stamping.